Author: Aria Belle

  • Crab Legs: The Ultimate Delicious Feast You Can’t Resist!

    Crab Legs: The Ultimate Delicious Feast You Can’t Resist!

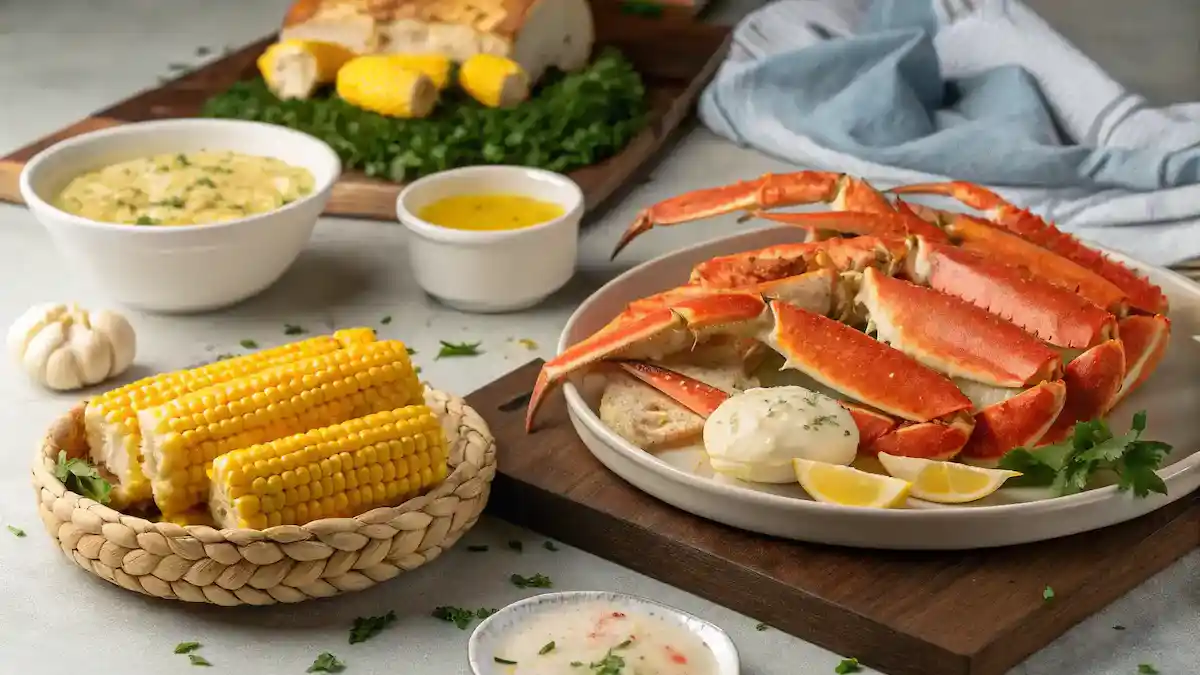
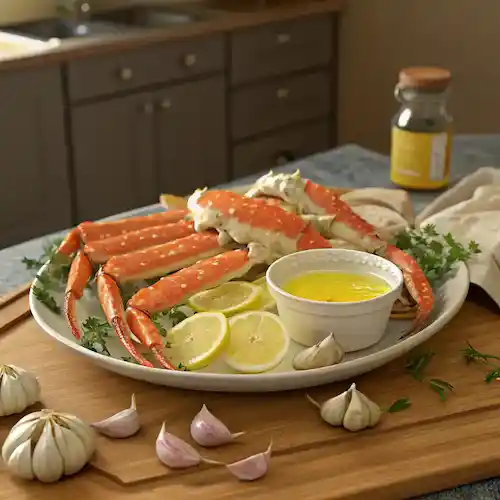
    Crab legs are a succulent delight that promise to elevate your dining experience! Imagine tender, sweet meat, perfectly steamed and bursting with flavor, just waiting to be dipped in a zesty garlic butter sauce made with fresh herbs and a splash of lemon juice. Each bite is a celebration of oceanic goodness, making it impossible to resist. Serve them with a side of vibrant, roasted vegetables or fluffy rice, and you have a feast that’s not just a meal, but a joyful occasion. Get ready to indulge in this irresistible treat!

    Why You’ll Love This Recipe

    • Indulge in the sweet, succulent flavor of fresh crab legs.
    • Perfect for special occasions or a cozy night in.
    • Quick and easy preparation means more time to enjoy!
    • Versatile pairing options to suit any palate.
    • Impress your guests with a gourmet experience at home.
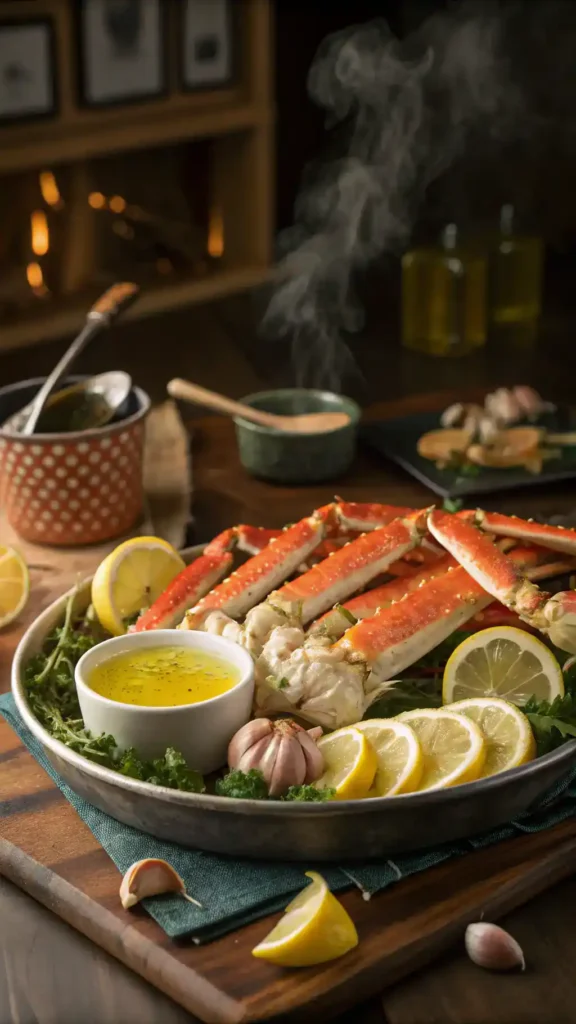
    Cooked crab legs served on a white plate with lemon slices, parsley, garlic cloves, and a bowl of melted butter.
    Aria Belle

    crab legs

    Indulge in a mouthwatering crab legs feast! Discover easy steps to prepare and enjoy this delicious seafood delight. 🦀✨
    Prep Time 15 minutes
    Cook Time 10 minutes
    Total Time 25 minutes
    Servings: 4 servings
    Course: Seafood
    Cuisine: American
    Calories: 400

    Ingredients
      

    Crab legs
    • 2 pounds Crab legs The star of the dish, choose fresh or frozen for the best flavor.
    Butter
    • 1/2 cup Butter Adds richness and enhances the natural sweetness of the crab.
    Garlic
    • 4 cloves Garlic Infuses the dish with aromatic flavor; use fresh for the best results.
    Lemon
    • 1 whole Lemon Brightens the dish and balances the richness; serve wedges on the side.
    Old Bay seasoning
    • 2 tablespoons Old Bay seasoning A classic crab seasoning that adds a delightful spice blend.
    Parsley
    • 1/4 cup Parsley For garnish; adds a pop of color and freshness to the plate.
    Chicken broth
    • 2 cups Chicken broth A great non-alcoholic substitute for steaming or cooking the crab.

    Equipment

    • 1 large pot For boiling the crab legs.
    • 1 Small saucepan For preparing the butter sauce.

    Method
     

    Step 1: Gather Your Ingredients
    1. Collect fresh crab legs, melted butter, lemon wedges, garlic, and your favorite seasoning blend.
    Step 2: Prepare the Crab Legs
    1. Rinse the crab legs under cold water to remove any debris. Pat them dry with a paper towel.
    Step 3: Boil Water
    1. Fill a large pot with water and bring it to a rolling boil. Add a pinch of salt for flavor.
    Step 4: Cook the Crab Legs
    1. Carefully add the crab legs to the boiling water. Cook for about 5-7 minutes until heated through.
    Step 5: Prepare the Butter Sauce
    1. In a small saucepan, melt butter over low heat. Add minced garlic and your seasoning blend. Stir well.
    Step 6: Drain and Serve
    1. Remove the crab legs from the pot and drain them. Arrange on a platter and serve with lemon wedges and garlic butter.
    Step 7: Enjoy!
    1. Dig in and savor every delicious bite of your crab legs. Don’t forget to dip them in that buttery goodness!

    Recipe Snapshot

    FeatureDetails
    Category:Seafood
    Cuisine:American
    Prep Time:15 minutes
    Cook Time:10 minutes
    Total Time:25 minutes
    Dietary:Gluten-free
    Serves:4
    Best Served:With melted butter

    Ingredients

    Ingredients for crab legs including fresh crab, butter, garlic, and lemon.
    Gather your ingredients for a perfect crab leg dish!
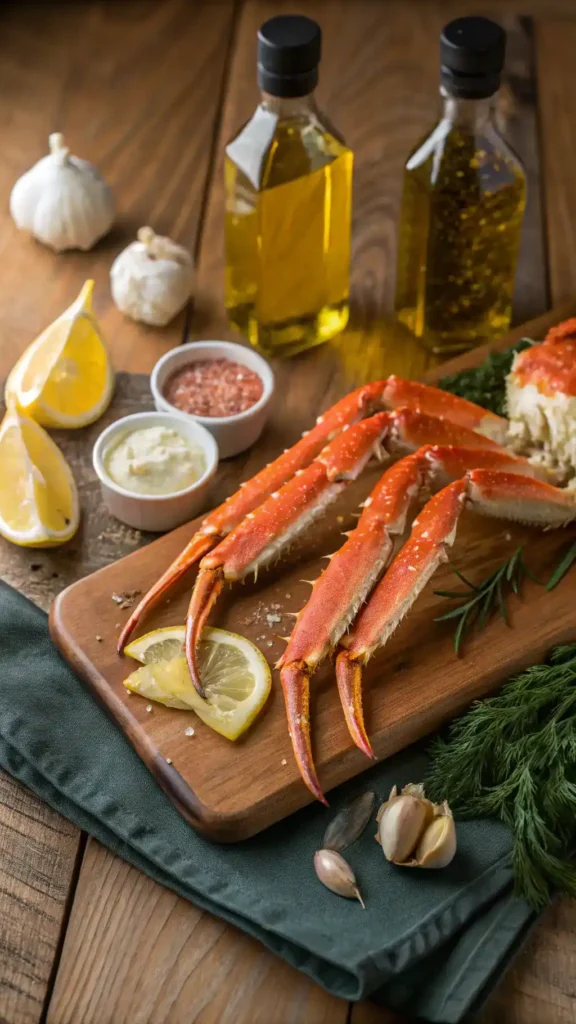
    • Crab legs – the star of the dish, choose fresh or frozen for the best flavor.
    • Butter – adds richness and enhances the natural sweetness of the crab.
    • Garlic – infuses the dish with aromatic flavor; use fresh for the best results.
    • Lemon – brightens the dish and balances the richness; serve wedges on the side.
    • Old Bay seasoning – a classic crab seasoning that adds a delightful spice blend.
    • Parsley – for garnish; adds a pop of color and freshness to the plate.
    • Chicken broth – a great non-alcoholic substitute for steaming or cooking the crab.

    Ingredients with measurements will be right under the article in the recipe card.

    How to Make the Recipe

    A delicious platter of crab legs served with melted butter and lemon wedges.
    Dive into a delicious crab leg feast!

    Get ready to dive into a delicious crab leg feast! Follow these simple steps for a mouthwatering experience.

    Step 1: Gather Your Ingredients

    Collect fresh crab legs, melted butter, lemon wedges, garlic, and your favorite seasoning blend.

    Step 2: Prepare the Crab Legs

    Rinse the crab legs under cold water to remove any debris. Pat them dry with a paper towel.

    Step 3: Boil Water

    Fill a large pot with water and bring it to a rolling boil. Add a pinch of salt for flavor.

    Step 4: Cook the Crab Legs

    Carefully add the crab legs to the boiling water. Cook for about 5-7 minutes until heated through.

    Step 5: Prepare the Butter Sauce

    In a small saucepan, melt butter over low heat. Add minced garlic and your seasoning blend. Stir well.

    Step 6: Drain and Serve

    Remove the crab legs from the pot and drain them. Arrange on a platter and serve with lemon wedges and garlic butter.

    Step 7: Enjoy!

    Dig in and savor every delicious bite of your crab legs. Don’t forget to dip them in that buttery goodness!

    Pro Tips for Making the Recipe

    •Choose fresh crab legs for the best flavor and texture. Look for a bright color and a slight ocean scent.
    •Steam the crab legs instead of boiling them to retain more flavor and moisture.
    •Use a mix of melted butter and lemon juice for a zesty dipping sauce that complements the sweetness of the crab.
    •Serve with warm, crusty bread to soak up any leftover butter sauce—it’s a must!
    •Don’t forget to have crab crackers and forks on hand for easy eating and maximum enjoyment!

    How to Serve

    Delight in your recipe with these fun serving suggestions:

    • Serve with melted garlic butter for a classic dip.
    • Pair with lemon wedges for a zesty kick.
    • Try a spicy remoulade for an extra flavor boost.
    • Accompany with a fresh garden salad for a light touch.
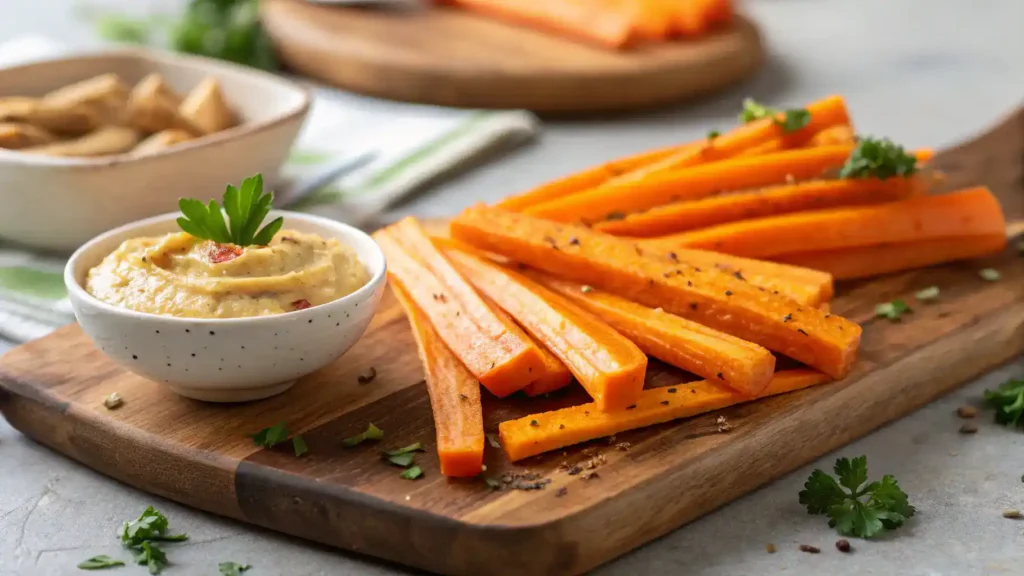
    • Include corn on the cob for a hearty side.
    • Offer a side of coleslaw for a crunchy contrast.
    • Serve with crusty bread to soak up the delicious juices.
    • For a twist, try a mango salsa for a tropical flair.
    • Set up a crab leg boil with potatoes and veggies for a feast.
    • Enjoy with a refreshing iced tea or sparkling lemonade.

    Make Ahead and Storage

    Storing leftovers properly ensures you can enjoy your recipe later without losing flavor.

    Storing Leftovers

    • Allow crab legs to cool to room temperature.
    • Wrap them tightly in plastic wrap or aluminum foil.
    • Place wrapped crab legs in an airtight container.
    • Store in the refrigerator for up to 3 days.

    Freezing

    • Cool crab legs completely before freezing.
    • Wrap each leg individually in plastic wrap.
    • Place wrapped legs in a freezer-safe bag or container.
    • Label with the date and freeze for up to 3 months.

    Reheating

    • Thaw crab legs in the refrigerator overnight.
    • Steam for 5-7 minutes until heated through.
    • Alternatively, microwave on low power in short intervals.
    • Serve immediately for the best texture and taste.

    you van visit our breakfast, lunch, dinner and desserts recipes from here:

    Breakfast, Lunch, Dinner, Dessert / Cake

    FAQs

    What are the best ways to cook crab legs?

    Steaming, boiling, or baking are all excellent methods for cooking crab legs. Steaming preserves their flavor and moisture, while boiling is quick and easy. Baking with a bit of butter and seasoning can add a delicious twist!

    How do I know when crab legs are done cooking?

    Crab legs are typically pre-cooked and just need to be heated through. They are done when they turn a bright orange color and are hot to the touch. A quick taste test can also help you determine if they are ready!

    What should I serve with crab legs?

    Crab legs pair wonderfully with melted butter, lemon wedges, and a side of garlic bread. You can also serve them with a fresh salad or some roasted vegetables for a complete meal.

    Can I use frozen crab legs?

    Absolutely! Frozen crab legs are a convenient option. Just make sure to thaw them in the refrigerator overnight before cooking for the best results. This helps maintain their texture and flavor.

    Final Thoughts

    Crab legs are not just a meal; they’re an experience! Picture yourself cracking open those shells, savoring the sweet, tender meat, and sharing laughter with loved ones. It’s simple, rewarding, and oh-so-delicious! So, gather your ingredients, put on your favorite tunes, and dive into this delightful feast. You deserve it! Enjoy every bite, and let the joy of crab legs bring a smile to your face!

  • Jerk Seasoning Recipe: The Ultimate Flavor Boost for Your Dishes

    Jerk Seasoning Recipe: The Ultimate Flavor Boost for Your Dishes

    Jerk seasoning recipe is your ticket to a vibrant explosion of flavors that will elevate any meal! This delightful blend of spices, including allspice, thyme, and a hint of heat from cayenne pepper, creates a tantalizing marinade that dances on your taste buds. Perfect for chicken, fish, or even grilled veggies, this seasoning brings the essence of the Caribbean right to your kitchen. Just mix the spices with a splash of lime juice and a drizzle of olive oil, and you’re ready to embark on a culinary adventure that’s both easy and irresistibly delicious!

    Why You’ll Love This Recipe

    • It’s a flavor explosion that transforms any dish into a culinary adventure.
    • Easy to make with common spices you probably already have at home.
    • Versatile enough for chicken, fish, and even veggies everyone can enjoy it!
    • Customizable to suit your spice tolerance make it as mild or fiery as you like!
    • Perfect for meal prep; whip up a batch and elevate your weeknight dinners.
    Grilled jerk chicken breast served with sliced bell peppers, grilled pineapple, and green onions on a wooden plate
    Aria Belle

    jerk seasoning recipe

    Discover the ultimate jerk seasoning recipe that brings a burst of flavor to your dishes! Perfect for grilling and marinating. 🌶️🍗
    Prep Time 10 minutes
    Total Time 10 minutes
    Servings: 1 cup
    Course: Seasoning
    Cuisine: Caribbean
    Calories: 50

    Ingredients
      

    Spices and Herbs
    • 1 tbsp Allspice Adds a warm, aromatic flavor.
    • 1 tbsp Thyme Provides an earthy note.
    • 2 pcs Scotch Bonnet Peppers Delivers the signature heat.
    • 1 tbsp Garlic Powder Enhances overall flavor.
    • 1 tbsp Onion Powder Adds sweetness and richness.
    • 1 tbsp Brown Sugar Balances the heat.
    • 1 tbsp Black Pepper Contributes a sharp flavor.
    • 1 tbsp Salt Enhances all flavors.
    • 1 tbsp Ginger Adds zesty warmth.
    • 2 tbsp Lime Juice Brings acidity and freshness.
    • 2 tbsp Olive Oil Adds moisture to the marinade.

    Method
     

    Preparation Steps
    1. Step 1: Gather your ingredients.
    2. Step 2: Prepare the fresh ingredients by chopping green onions and scotch bonnet peppers.
    3. Step 3: Mix the dry ingredients in a bowl until well blended.
    4. Step 4: Add the fresh ingredients to the dry mixture and stir.
    5. Step 5: Blend the mixture in a food processor for a smoother texture.
    6. Step 6: Store the jerk seasoning in an airtight container.
    7. Step 7: Enjoy your flavor boost on grilled meats, vegetables, or tofu!

    Notes

    Essential nutrition facts per serving:
    Nutrient Amount
    Calories 50
    Fat 1g
    Protein 1g
    Carbs 12g

    Recipe Snapshot

    FeatureDetails
    Category:Seasoning
    Cuisine:Caribbean
    Prep Time:10 minutes
    Cook Time:0 minutes
    Total Time:10 minutes
    Dietary:Gluten-free, Vegan
    Serves:Makes about 1 cup
    Best Served:With grilled meats, vegetables, or tofu

    Ingredients

    Ingredients for jerk seasoning including allspice, thyme, and scotch bonnet peppers displayed on a wooden table.
    Essential ingredients for a perfect jerk seasoning.
    • Allspice – adds a warm, aromatic flavor that is essential to jerk seasoning.
    • Thyme – provides an earthy note that complements the spices beautifully.
    • Scotch Bonnet Peppers – delivers the signature heat; use less for a milder kick.
    • Garlic Powder – enhances the overall flavor with a savory depth.
    • Onion Powder – adds sweetness and richness to the seasoning mix.
    • Brown Sugar – balances the heat with a touch of sweetness.
    • Black Pepper – contributes a sharp, pungent flavor that rounds out the seasoning.
    • Salt – enhances all the flavors and is crucial for seasoning.
    • Ginger – adds a zesty warmth that brightens the mix.
    • Lime Juice – brings acidity and freshness, helping to tenderize meats.
    • Olive Oil – helps to bind the spices and adds moisture to the marinade.

    Ingredients with measurements will be right under the article in the recipe card.

    How to Make the Recipe

    A vibrant display of fresh herbs and spices being mixed to create jerk seasoning.
    Step-by-step guide to making your own jerk seasoning.

    Get ready to create a flavor explosion with this jerk seasoning recipe! Follow these simple steps to whip up your very own blend.

    Step 1: Gather Your Ingredients

    Collect all the spices and herbs you’ll need: allspice, thyme, cinnamon, nutmeg, garlic powder, onion powder, brown sugar, salt, black pepper, and cayenne pepper. Don’t forget some fresh green onions and scotch bonnet peppers for that authentic kick!

    Step 2: Prepare the Fresh Ingredients

    Chop the green onions and scotch bonnet peppers finely. If you prefer less heat, remove the seeds from the peppers. Your kitchen will start to smell amazing!

    Step 3: Mix the Dry Ingredients

    In a bowl, combine all the dry spices: allspice, thyme, cinnamon, nutmeg, garlic powder, onion powder, brown sugar, salt, black pepper, and cayenne pepper. Stir them together until well blended.

    Step 4: Add the Fresh Ingredients

    Now, add the chopped green onions and scotch bonnet peppers to the dry mixture. Give it a good stir to ensure everything is evenly distributed.

    Step 5: Blend It All Together

    If you want a smoother texture, transfer the mixture to a food processor. Pulse it a few times until everything is well combined. Just be careful not to over blend!

    Step 6: Store Your Jerk Seasoning

    Transfer your jerk seasoning to an airtight container. Store it in a cool, dry place. It will keep its flavor for several weeks, but trust me, you’ll want to use it up quickly!

    Step 7: Enjoy Your Flavor Boost!

    Now that you have your homemade jerk seasoning, sprinkle it on chicken, fish, or veggies before grilling or roasting. Get ready for a taste sensation that will have everyone asking for seconds!

    Pro Tips for Making the Recipe

    • Use fresh herbs and spices for the best flavor. Dried versions can work, but fresh brings a vibrant taste.
    • Adjust the heat level by varying the amount of Scotch bonnet peppers or using milder peppers if preferred.
    • Let the seasoning marinate on your protein for at least a few hours, or overnight for deeper flavor penetration.
    • Experiment with adding a splash of lime juice or apple cider vinegar for a tangy twist.
    • Store any leftover seasoning in an airtight container in the fridge for up to a month to keep it fresh.

    How to Serve

    • Rub jerk seasoning on grilled chicken for a spicy kick.
    • Mix into ground turkey or chicken for flavorful burgers.
    • Sprinkle on roasted vegetables for a zesty twist.
    • Use as a marinade for tofu or tempeh before grilling.
    • Stir into quinoa or rice for a vibrant side dish.
    • Top fish tacos with jerk-seasoned grilled fish and fresh salsa.
    • Pair with mango salsa for a sweet and spicy contrast.
    • Serve alongside coconut rice for a tropical flair.
    • Incorporate into a hearty vegetable stew for added depth.
    • Use in wraps with fresh greens and avocado for a tasty lunch.

    Make Ahead and Storage

    Proper storage of your jerk seasoning can enhance its flavor and longevity.

    Storing Leftovers

    • Allow the jerk seasoning to cool completely before storing.
    • Transfer to an airtight container.
    • Store in the refrigerator for up to 2 weeks.
    • Label the container with the date for easy tracking.

    Freezing

    • Portion the jerk seasoning into freezer-safe bags or containers.
    • Remove as much air as possible to prevent freezer burn.
    • Label with the date and type of seasoning.
    • Freeze for up to 6 months for best quality.

    Reheating

    • Thaw frozen jerk seasoning in the refrigerator overnight.
    • Reheat in a saucepan over low heat, stirring occasionally.
    • Add a splash of water or broth if it seems too thick.
    • For best flavor, reheat gently to avoid losing spices’ potency.

    you van visit our breakfast, lunch, dinner and desserts recipes from here:

    Breakfast, Lunch, Dinner, Dessert / Cake

    FAQs

    What is jerk seasoning made of?

    Jerk seasoning typically includes a blend of spices like allspice, thyme, and scotch bonnet peppers. You can also add garlic, ginger, and onion for extra flavor. Feel free to adjust the heat level by using milder peppers if you prefer.

    Can I use jerk seasoning on vegetables?

    Absolutely! Jerk seasoning works wonderfully on vegetables. Toss your favorite veggies in the seasoning before grilling or roasting for a delicious, spicy kick.

    How long can I store homemade jerk seasoning?

    Homemade jerk seasoning can be stored in an airtight container for up to six months. Keep it in a cool, dark place to maintain its flavor and potency.

    What can I substitute for scotch bonnet peppers?

    If scotch bonnet peppers are hard to find, you can substitute them with habanero peppers for a similar heat level. For a milder option, try using jalapeños or a mix of bell peppers and cayenne pepper.

    Final Thoughts

    There you have it, a delightful jerk seasoning recipe that’s sure to elevate your meals! Just imagine the aroma wafting through your kitchen as you whip up this flavorful blend. It’s simple, rewarding, and perfect for sharing with friends and family. So go ahead, sprinkle it on your favorite dishes, and let the good times roll. Enjoy every bite, and happy cooking!

  • Goat Cheese Burger: The Ultimate Flavor Packed Delight!

    Goat Cheese Burger: The Ultimate Flavor Packed Delight!

    Are you ready to elevate your burger game? This goat cheese burger recipe is not just another meal; it’s a flavor explosion that’s quick and easy to whip up! Imagine juicy beef patties topped with creamy, tangy goat cheese, all nestled in a soft bun. Perfect for busy weeknights or weekend gatherings, this easy goat cheese burger will impress your family and friends. So, grab your apron and let’s dive into a culinary adventure that’s sure to satisfy your cravings and bring smiles to the dinner table!

    INTRODUCTION

    What is goat cheese burger?

    This goat cheese burger is a delightful blend of juicy beef patty and creamy goat cheese, creating a unique flavor experience. The main ingredients include a perfectly grilled beef patty, tangy goat cheese, fresh vegetables, and a soft bun, all coming together to tantalize your taste buds.

    The flavor profile of this burger is rich and savory, with the goat cheese adding a distinct creaminess that complements the meat. Each bite offers a burst of freshness from the toppings, making it a satisfying meal that stands out from traditional burgers.

    Why This goat cheese burger is a Must-Try

    This goat cheese burger is a must-try for anyone looking to elevate their burger game. Its unique combination of flavors and textures makes it a standout choice for any meal.

    • Versatile: Can be enjoyed any time of day.
    • Flavor-packed: Bursting with fresh and complementary flavors.
    • Easy to Make: Perfect for both beginners and seasoned cooks.

    Keep reading to discover how you can make this mouthwatering goat cheese burger at home!

    Gourmet beef burger with tomatoes, arugula, and cheese, served with French fries and dipping sauce.
    Aria Belle

    goat cheese burger

    Savor the deliciousness of a goat cheese burger! Juicy beef, creamy goat cheese, and fresh toppings make this a must-try! 🍔✨
    Prep Time 15 minutes
    Cook Time 10 minutes
    Total Time 25 minutes
    Servings: 4 burgers
    Course: Main Course
    Cuisine: American
    Calories: 500

    Ingredients
      

    Main Ingredients
    • 1 lb ground beef For the best flavor, choose high-quality ground beef.
    • 4 oz goat cheese Creamy and tangy, elevates the burger.
    • 4 pieces brioche bun Soft and slightly sweet.
    Fresh Herbs
    • to taste fresh arugula or spinach Adds a burst of freshness.
    • 1 tbsp olive oil For cooking the patties.
    • 1 tsp garlic powder Enhances overall flavor.
    • 1 tsp onion powder Enhances overall flavor.
    • to taste salt and pepper For seasoning.
    • 1 slices tomato For topping.
    • optional balsamic glaze For drizzling.
    Optional Additions & Enhancements
    • to taste caramelized onions Adds sweetness and depth.
    • to taste sautéed mushrooms Pairs beautifully with goat cheese.
    • to taste avocado Adds creaminess and healthy fats.
    • to taste spicy aioli Adds a kick of heat.

    Equipment

    • 1 Skillet For cooking the patties.
    • 1 Mixing bowl For mixing the ingredients.

    Method
     

    Gather Ingredients
    1. In a bowl, mix ground beef with garlic powder, onion powder, salt, and pepper. Form into 4 patties, making a slight indentation in the center. Chill patties for 15 minutes to help them hold shape.
    Cooking Process
    1. Heat olive oil in a skillet over medium-high heat. Cook patties for 4-5 minutes on each side, or until desired doneness. In the last minute of cooking, top each patty with goat cheese to melt.
    Assembly/Plating
    1. Toast burger buns lightly on the skillet. Place the patty on the bottom bun, add arugula, and tomato slices. Drizzle with balsamic glaze if desired, and top with the other half of the bun.

    Notes

    Pro Tips: For extra crispiness, preheat your pan before adding the ingredients! Let the burgers rest for a few minutes before serving to keep them juicy.

    Ingredients for goat cheese burger

    Discover the key ingredients that make this goat cheese burger a flavor sensation!

    Main Ingredients:

    Ingredients for goat cheese burger
    Discover the key ingredients that make this goat cheese burger a flavor sensation!
    • Ground beef: For the best goat cheese burger, choose high-quality ground beef for optimum flavor.
    • Goat cheese: Creamy and tangy, it elevates the burger to a gourmet level.
    • Brioche bun: Soft and slightly sweet, it perfectly complements the savory elements.
    • Fresh herbs: Basil or arugula add a burst of freshness.
    • Garlic: A hint of garlic enhances the overall flavor profile.

    Optional Additions & Enhancements:

    • Caramelized onions: Sweet and savory, they add depth.
    • Sautéed mushrooms: Earthy flavors that pair beautifully with goat cheese.
    • Avocado: Creamy texture and healthy fats for a satisfying bite.
    • Spicy aioli: A kick of heat to balance the richness.

    What do you like to add to your goat cheese burger? Let us know in the comments!

    How to Make Goat Cheese Burger

    Gather Ingredients:

    • 1 lb ground beef
    • 4 oz goat cheese
    • 1 tbsp olive oil
    • 1 tsp garlic powder
    • 1 tsp onion powder
    • Salt and pepper to taste
    • 4 burger buns
    • Fresh arugula or spinach
    • Tomato slices
    • Optional: balsamic glaze

    Preparation:

    • In a bowl, mix ground beef with garlic powder, onion powder, salt, and pepper.
    • Form into 4 patties, making a slight indentation in the center.
    • Chill patties for 15 minutes to help them hold shape.

    Cooking Process:

    • Heat olive oil in a skillet over medium-high heat.
    • Cook patties for 4-5 minutes on each side, or until desired doneness.
    • In the last minute of cooking, top each patty with goat cheese to melt.

    Assembly/Plating:

    • Toast burger buns lightly on the skillet.
    • Place the patty on the bottom bun, add arugula, and tomato slices.
    • Drizzle with balsamic glaze if desired, and top with the other half of the bun.

    Pro Tips:

    • Tip: For extra crispiness, preheat your pan before adding the ingredients!
    • Tip: Let the burgers rest for a few minutes before serving to keep them juicy.

    Variations suggesgtions and Pairings for goat cheese burger

    Elevate your goat cheese burger experience with exciting variations and perfect pairings that cater to every palate.

    Variations:

    Try a spicy version by adding a pinch of chili flakes. For a vegetarian twist, substitute the beef patty with a black bean burger. Add caramelized onions for a sweet touch. Incorporate fresh herbs like basil or thyme for an aromatic flavor boost. Experiment with different types of goat cheese, such as herbed or smoked varieties.

    Customizations:

    Enhance your burger with toppings like arugula, roasted red peppers, or avocado slices. Drizzle balsamic glaze for a tangy kick. Use a garlic aioli or tzatziki sauce for added creaminess. Consider adding crispy bacon for a savory crunch.

    Serving and Pairings:

    Delicious goat cheese burger with fresh toppings
    Savor the flavor of this gourmet goat cheese burger!

    Pair your goat cheese burger with sweet potato fries or a fresh garden salad. A side of coleslaw adds a nice crunch. For beverages, try a crisp white wine or a light lager. Iced tea or lemonade also complements the flavors beautifully.

    Health Benefits of goat cheese burger

    Goat cheese burgers offer a delightful combination of flavors and health benefits. The key ingredients in this dish, such as goat cheese, lean meat, and fresh vegetables, provide essential nutrients. Goat cheese is lower in fat and calories compared to cow’s cheese, making it a great choice for those watching their weight. It’s also rich in vitamins A and B, which support eye health and energy metabolism. The lean meat contributes high-quality protein, essential for muscle repair and growth. Additionally, the inclusion of fresh veggies adds fiber and antioxidants, promoting digestive health and reducing inflammation. Packed with protein and fiber, this goat cheese burger supports a balanced diet.

    Healthier Choices:

    To make your goat cheese burger even healthier, consider using whole grain buns instead of white bread for added fiber and nutrients. Opt for leaner cuts of meat or even turkey or plant-based patties to reduce saturated fat. You can also experiment with low-sodium goat cheese to keep your sodium intake in check. Adding a variety of colorful veggies like spinach, tomatoes, and avocados not only boosts the nutritional value but also enhances the flavor. With these simple swaps, you can enjoy a nutritious goat cheese burger that fits perfectly into your busy lifestyle.

    FAQS about goat cheese burger

    Here are some common questions about goat cheese burgers that can help you enjoy this delicious dish even more!

    Can I substitute goat cheese in this recipe?

    Yes, you can substitute goat cheese with feta or cream cheese for a different flavor profile. Each alternative brings its unique taste, so feel free to experiment based on your preference!

    How long does goat cheese burger last in the fridge?

    Typically, it stays fresh for 3-5 days when stored properly in an airtight container. Just make sure to keep it sealed to maintain its flavor and texture!

    Can I make goat cheese burger ahead of time?

    Absolutely! Preparing it in advance can even enhance the flavors. You can cook the patties and store them in the fridge, then assemble the burgers just before serving.

    What toppings pair well with goat cheese burger?

    Delicious toppings include caramelized onions, arugula, roasted red peppers, or a drizzle of balsamic glaze. These add extra layers of flavor that complement the creamy goat cheese perfectly!

    Conclusion

    The goat cheese burger is not just a meal; it’s an experience bursting with flavor! Its creamy, tangy cheese perfectly complements the juicy patty, making every bite a delight. Whether you’re a busy mom or a professional, this quick recipe fits seamlessly into your lifestyle. Now it’s your turn! Try this goat cheese burger recipe and share your thoughts or favorite twists in the comments below! We can’t wait to hear how you make it your own!

  • Bolio Roll: The Ultimate Delight for Your Taste Buds!

    Bolio Roll: The Ultimate Delight for Your Taste Buds!

    Craving something delicious and easy to make? This bolio roll recipe is your answer! Imagine biting into a warm, fluffy roll filled with bold flavors that dance on your palate. Perfect for busy moms and professionals alike, these easy bolio rolls come together in no time, making them an ideal choice for a quick lunch or a delightful dinner. With simple ingredients and straightforward steps, you’ll have a meal that not only satisfies your hunger but also impresses your family and friends. Let’s dive into this culinary adventure!

    INTRODUCTION

    What is bolio roll?

    The bolio roll is a delicious culinary creation that combines soft, fluffy bread with a variety of flavorful fillings. This bolio roll is a delightful blend of textures and tastes, making it a popular choice for many food lovers. Typically, it features a base of enriched dough, which is then filled with ingredients like meats, cheeses, and fresh vegetables.

    With its origins rooted in traditional recipes, the bolio roll offers a unique flavor profile that is both savory and satisfying. The combination of warm bread and fresh fillings creates a mouthwatering experience that is hard to resist. Whether enjoyed as a snack or a meal, the bolio roll is sure to please your taste buds.

    Why This bolio roll is a Must-Try

    This bolio roll is a must-try for anyone seeking a quick and delicious meal option. Its versatility allows it to be enjoyed at any time of day, making it perfect for breakfast, lunch, or dinner.

    • Versatile: Can be enjoyed any time of day.
    • Flavor-packed: Bursting with fresh and complementary flavors.
    • Easy to Make: Perfect for both beginners and seasoned cooks.

    Keep reading to discover how you can make this mouthwatering bolio roll at home!

    Stuffed bolillo sandwich filled with vegetables and ham, served with dipping sauce on a plate.
    Aria Belle

    bolio roll

    Discover the deliciousness of bolio roll! A perfect blend of flavors wrapped in soft bread. Try it today! 🌯✨
    Prep Time 15 minutes
    Cook Time 10 minutes
    Total Time 25 minutes
    Servings: 4 rolls
    Course: Snack
    Cuisine: Mexican
    Calories: 200

    Ingredients
      

    Main Ingredients
    • 1 cup flour All-purpose flour.
    • 1/2 cup water Adjust as needed for dough consistency.
    • 1 tsp salt For flavor.
    • 1 tbsp oil For moisture.
    Savory Fillings
    • to taste seasoned meats or veggies Choose your favorite fillings.
    • to taste cheese Melty cheese enhances flavor.
    • to taste sauces Your favorite sauce for drizzling.

    Equipment

    • 1 Mixing bowl For mixing the dough.
    • 1 Pan For cooking the bolio rolls.

    Method
     

    Gather Ingredients
    1. Mix flour, salt, and oil in a bowl. Add water gradually until a dough forms. Knead for 5 minutes, then let it rest for 15 minutes.
    Cooking Process
    1. Roll out the dough into thin circles. Heat a pan over medium heat. Cook each circle for 1-2 minutes on each side until golden. Remove from heat and let cool slightly.
    Assembly/Plating
    1. Place your filling in the center of each circle. Fold the edges over the filling and press to seal. Serve warm with your favorite dipping sauce.

    Notes

    Essential nutrition facts per serving:
    Calories Fat Protein Carbs
    200 8g 5g 30g

    Ingredients for bolio roll

    Ingredients for bolio roll including bread, fillings, and sauces.
    Discover the key components that make the bolio roll a delightful treat.

    Discover the key components that make the bolio roll a delightful treat.

    Main Ingredients:

    • Fresh Bolio Bread: For the best bolio roll, choose high-quality bolio bread for optimum flavor.
    • Savory Fillings: Options like seasoned meats or veggies add depth and richness.
    • Cheese: A melty cheese enhances the overall taste and texture.
    • Sauces: A drizzle of your favorite sauce brings everything together.

    Optional Additions & Enhancements:

    Want to customize your bolio roll? Here are some fun ideas:

    • Spicy Jalapeños: Add a kick to your roll.
    • Fresh Herbs: Basil or cilantro can brighten the flavors.
    • Avocado: Creamy avocado adds richness.

    What do you like to add to your bolio roll? Let us know in the comments!

    How to Make bolio roll

    How to make bolio roll with ingredients and preparation steps.
    Step-by-step guide to making delicious bolio rolls.

    Gather Ingredients:

    • 1 cup flour
    • 1/2 cup water
    • 1 tsp salt
    • 1 tbsp oil
    • Your choice of filling (meat, veggies, cheese)

    Preparation:

    • Mix flour, salt, and oil in a bowl.
    • Add water gradually until a dough forms.
    • Knead for 5 minutes, then let it rest for 15 minutes.

    Cooking Process:

    1. Roll out the dough into thin circles.
    2. Heat a pan over medium heat.
    3. Cook each circle for 1-2 minutes on each side until golden.
    4. Remove from heat and let cool slightly.

    Assembly/Plating:

    • Place your filling in the center of each circle.
    • Fold the edges over the filling and press to seal.
    • Serve warm with your favorite dipping sauce.

    Pro Tips:

    • Tip: For extra crispiness, preheat your pan before adding the ingredients!
    • Tip: Experiment with different fillings for variety!

    Variations suggestions and Pairings for bolillo rolls

    Explore the delightful world of bolio roll variations and pairings that can elevate your culinary experience.

    Variations:

    Try a spicy version by adding a pinch of chili flakes.
    For a vegetarian twist, substitute meat with grilled vegetables.
    Experiment with a sweet version by adding a drizzle of honey or maple syrup.
    Incorporate cheese for a creamy texture and rich flavor.

    Customizations:

    Add fresh herbs like cilantro or parsley for a burst of freshness.
    Top with avocado slices for creaminess.
    Include pickled jalapeños for an extra kick.
    Serve with a tangy dipping sauce for added flavor.

    Serving and Pairings:

    A refreshing salad complements the richness of the roll.
    Enjoy with a chilled iced tea or lemonade for a perfect balance.
    Consider a light beer or sparkling water for a fun twist.

    Health Benefits of bolillo rolls

    bolillo rolls are not just a delicious treat; they also offer numerous health benefits. Packed with protein and fiber, this bolio roll supports a balanced diet. The key ingredients, such as whole grains, provide essential vitamins and minerals, while the inclusion of fresh vegetables adds antioxidants that help combat oxidative stress. These nutrients work together to boost your immune system and promote overall well-being, making the bolio roll a nutritious choice for busy individuals.

    Nutritional Value:

    Whole grains in bolillo rolls are rich in B vitamins, which are crucial for energy metabolism. Fresh vegetables contribute vitamins A and C, enhancing skin health and immunity. Additionally, the protein content helps in muscle repair and growth, making it a great post-workout snack. Overall, a bolillo roll is a powerhouse of nutrients that can fit seamlessly into a healthy lifestyle.

    Healthier Choices:

    To make your bolio roll even healthier, consider using whole grain or sprouted grain bread as a base. Opt for low-sodium fillings and fresh herbs to enhance flavor without added salt. Incorporating lean proteins, like grilled chicken or turkey, can boost the nutritional profile. By making these simple swaps, you can enjoy a nutritious bolio roll that aligns with your health goals while still being quick and easy to prepare.

    FAQS about bolio roll

    Here are some common questions about bolio roll that can help you enjoy this delightful treat even more!

    Can I substitute ingredients in the bolillo rolls recipe?

    Yes, you can substitute ingredients in the bolio roll recipe! For instance, if you don’t have cream cheese, you can use Greek yogurt for a tangy twist. Similarly, feel free to swap out the herbs or spices to suit your taste preferences or dietary needs.

    How long does bolio roll last in the fridge?

    Typically, bolillo rolls stays fresh for 3-5 days when stored properly in an airtight container. Just make sure to keep it sealed to maintain its delicious flavor and texture!

    Can I make bolio roll ahead of time?

    Absolutely! Preparing bolillo rolls in advance can even enhance the flavors as they meld together. Just wrap it tightly and store it in the fridge until you’re ready to serve!

    What are some popular fillings for bolillo roll?

    Popular fillings for bolio roll include cream cheese, smoked salmon, and fresh vegetables. You can also experiment with sweet fillings like Nutella or fruit preserves for a delightful dessert version!

    Conclusion

    bolillo rolls are not just a treat; they’re a delightful experience for your taste buds! With their soft texture and endless filling possibilities, they can easily become a family favorite. Whether you stick to the classic recipe or get creative with your own variations, these rolls are sure to impress. Now it’s your turn! Try this bolillo rolls recipe and share your thoughts or favorite twists in the comments below! We can’t wait to hear how you make them your own!

  • Keto Whipped Cream: The Ultimate Delight for Your Desserts!

    Keto Whipped Cream: The Ultimate Delight for Your Desserts!

    Are you craving something delicious yet easy to whip up? This Keto Whipped Cream recipe is your answer! With just a few simple ingredients, you can create a rich and creamy topping that elevates any dessert while keeping your carb count low. Perfect for busy moms and professionals alike, this easy Keto Whipped Cream will become your go-to for adding a touch of indulgence to your favorite treats. Say goodbye to store-bought options and hello to homemade delight that fits perfectly into your keto lifestyle!

    INTRODUCTION

    What is Keto Whipped Cream?

    This Keto Whipped Cream is a delightful blend of heavy cream, sweetener, and vanilla extract, tailored for those following a ketogenic lifestyle. It offers a rich and creamy texture that elevates any dessert while keeping your carb count low.

    With its luscious flavor profile, this whipped cream is not only a treat for your taste buds but also a guilt-free indulgence. Perfect for topping off keto desserts or enjoying on its own, Keto Whipped Cream is a versatile addition to your culinary repertoire.

    Bowl of whipped cream topped with chocolate shavings, surrounded by fresh strawberries, blueberries, and a slice of chocolate cake.
    Aria Belle

    Keto Whipped Cream

    Indulge in the creamy goodness of Keto Whipped Cream! Perfect for your low-carb desserts, this easy recipe will satisfy your sweet tooth! 🍰✨
    Prep Time 10 minutes
    Cook Time 3 minutes
    Total Time 13 minutes
    Servings: 1 cup
    Course: Dessert
    Cuisine: Keto
    Calories: 100

    Ingredients
      

    Main Ingredients
    • 1 cup Heavy Whipping Cream The base of your whipped cream, providing rich texture and flavor.
    • 2-3 tablespoons Powdered Erythritol A keto-friendly sweetener that won’t spike your blood sugar.
    • 1 teaspoon Vanilla Extract Adds a delightful aroma and flavor to your whipped cream.
    Optional Additions & Enhancements
    • 1 tablespoon Cocoa Powder For a chocolatey twist.
    • 1 teaspoon Almond Extract A nutty flavor that pairs well with desserts.
    • 1 teaspoon Ground Cinnamon Adds warmth and spice.

    Equipment

    • 1 Mixing bowl Chill in the freezer for best results.
    • 1 Electric mixer For beating the cream.

    Method
     

    Gather Ingredients
    1. 1 cup heavy whipping cream, 2-3 tablespoons powdered erythritol, 1 teaspoon vanilla extract
    Preparation
    1. Chill your mixing bowl and beaters in the freezer for about 10 minutes for best results.
    Cooking Process
      1. Remove the chilled bowl and beaters from the freezer.
      2. Pour in the heavy whipping cream.
      3. Add the powdered erythritol and vanilla extract.
      4. Using an electric mixer, beat on medium speed until soft peaks form (about 2-3 minutes).
      5. Continue beating until stiff peaks form, being careful not to overbeat.
    Assembly/Plating
    1. Serve immediately over your favorite keto desserts or store in the fridge for up to 3 days.

    Notes

    For a richer flavor, try adding a pinch of salt! Use cold ingredients for the best texture!

    Why This Keto Whipped Cream is a Must-Try

    This Keto Whipped Cream is a must-try for anyone looking to enhance their dessert experience without compromising their dietary goals. Its unique combination of flavors and textures makes it a standout choice for both casual and special occasions.

    • Versatile: Can be enjoyed any time of day.
    • Flavor-packed: Bursting with fresh and complementary flavors.
    • Easy to Make: Perfect for both beginners and seasoned cooks.

    Keep reading to discover how you can make this mouthwatering Keto Whipped Cream at home!

    Ingredients

    Ingredients for Keto Whipped Cream
    Essential ingredients for making Keto Whipped Cream.

    Creating the perfect Keto Whipped Cream requires a few essential ingredients.

    Main Ingredients:

    • Heavy Whipping Cream: The base of your whipped cream, providing rich texture and flavor.
    • Powdered Erythritol: A keto-friendly sweetener that won’t spike your blood sugar.
    • Vanilla Extract: Adds a delightful aroma and flavor to your whipped cream.

    For the best Keto Whipped Cream, choose high-quality heavy whipping cream for optimum flavor.

    Optional Additions & Enhancements:

    • Cocoa Powder: For a chocolatey twist.
    • Almond Extract: A nutty flavor that pairs well with desserts.
    • Ground Cinnamon: Adds warmth and spice.

    What do you like to add to your Keto Whipped Cream? Let us know in the comments!

    How to Make

    Gather Ingredients:

    • 1 cup heavy whipping cream
    • 2-3 tablespoons powdered erythritol (or your preferred keto sweetener)
    • 1 teaspoon vanilla extract

    Preparation:

    Chill your mixing bowl and beaters in the freezer for about 10 minutes for best results.

    Cooking Process:

    1. Remove the chilled bowl and beaters from the freezer.
    2. Pour in the heavy whipping cream.
    3. Add the powdered erythritol and vanilla extract.
    4. Using an electric mixer, beat on medium speed until soft peaks form (about 2-3 minutes).
    5. Continue beating until stiff peaks form, being careful not to overbeat.

    Assembly/Plating:

    Serve immediately over your favorite keto desserts or store in the fridge for up to 3 days.

    Pro Tips:

    • Tip: For a richer flavor, try adding a pinch of salt!
    • Tip: Use cold ingredients for the best texture!

    Variations suggesgtions and Pairings

    Bowl of Keto Whipped Cream with desserts
    Keto Whipped Cream served with fresh berries and chocolate cake.

    Elevate your Keto Whipped Cream experience with these fun variations and perfect pairings that cater to your taste buds!

    Variations:

    Try a spicy version by adding a pinch of chili flakes. For a fruity twist, mix in some pureed berries. Experiment with a mocha flavor by incorporating a dash of espresso powder. For a vegetarian twist, substitute heavy cream with coconut cream for a dairy-free option. Add a splash of vanilla extract for a classic touch.

    Customizations:

    Enhance your whipped cream with a sprinkle of cinnamon or nutmeg. Drizzle in some sugar-free chocolate syrup for a decadent treat. Fold in some crushed nuts for added texture. A few drops of almond extract can bring a delightful nutty flavor. Consider adding a touch of sweetener like erythritol or stevia to suit your sweetness preference.

    Serving and Pairings:

    Serve your Keto Whipped Cream atop low-carb desserts like keto brownies or cheesecake. Pair it with fresh berries for a refreshing treat. It complements coffee or hot chocolate beautifully. Use it as a topping for keto pancakes or waffles. Enjoy it alongside a rich chocolate mousse for an indulgent experience.

    Health Benefits for Keto Whipped Cream

    Keto Whipped Cream is not just a delicious topping; it also offers several health benefits. Made primarily from heavy cream, it is rich in healthy fats that can support energy levels and promote satiety. Packed with protein and fiber, this Keto Whipped Cream supports a balanced diet. Additionally, the cream contains essential vitamins like A and D, which are crucial for maintaining healthy skin and immune function. The low-carb nature of this whipped cream makes it an excellent choice for those following a ketogenic diet, helping to keep blood sugar levels stable while satisfying sweet cravings.

    Nutritional Value:

    The key ingredients in Keto Whipped Cream provide a wealth of nutrients. Heavy cream is high in calcium, which is vital for bone health, and it also contains antioxidants that help combat oxidative stress. With its rich nutrient profile, this nutritious Keto Whipped Cream can be a guilt-free indulgence. By incorporating this whipped cream into your desserts, you can enjoy a treat that not only tastes great but also nourishes your body.

    Healthier Choices:

    To make your Keto Whipped Cream even healthier, consider using organic heavy cream to avoid additives and hormones. You can also sweeten it with natural low-carb sweeteners like stevia or erythritol instead of sugar. Opting for these healthier choices ensures that your recipe remains a delicious yet nutritious addition to your desserts. This way, you can indulge without compromising your health goals, making it a perfect fit for busy moms and professionals looking for quick, easy, and healthy options.

    FAQS about recipe

    Here are some common questions about Keto Whipped Cream that can help you make the most of this delightful treat!

    Can I substitute heavy cream in this recipe?

    Yes, you can substitute heavy cream with coconut cream for a dairy-free option. This will give your Keto Whipped Cream a unique flavor while keeping it low in carbs.

    How long does Keto Whipped Cream last in the fridge?

    Typically, it stays fresh for 3-5 days when stored properly in an airtight container. Just make sure to give it a quick whisk before serving again!

    Can I make Keto Whipped Cream ahead of time?

    Absolutely! Preparing it in advance can even enhance the flavors. Just store it in the fridge, and it will be ready when you need it.

    Is Keto Whipped Cream suitable for a low-carb diet?

    Yes, Keto Whipped Cream is perfect for a low-carb diet as it uses low-carb sweeteners and heavy cream, making it a delicious addition to your keto desserts.

    Conclusion

    Keto Whipped Cream is a game-changer for your dessert experience. It’s creamy, delicious, and fits perfectly into your low-carb lifestyle. Whether you’re topping off berries or enjoying it straight from the bowl, this treat is sure to satisfy your sweet tooth without the guilt. Now it’s your turn! Try this Keto Whipped Cream recipe and share your thoughts or favorite twists in the comments below!

  • Healthy Dinner Ideas for Truck Drivers: Ultimate Fuel for Success

    Healthy Dinner Ideas for Truck Drivers: Ultimate Fuel for Success

    Are you on the road and craving something delicious yet nutritious? These healthy dinner ideas for truck drivers are designed just for you! Packed with bold flavors and simple ingredients, these recipes will not only satisfy your hunger but also keep you energized for the journey ahead. Say goodbye to greasy takeout and hello to easy healthy dinner ideas that fit perfectly into your busy lifestyle. Let’s dive into meals that are as convenient as they are tasty, ensuring you feel great while you drive!

    INTRODUCTION

    What is healthy dinner ideas for truck drivers?

    This healthy dinner ideas for truck drivers is a delightful blend of nutritious ingredients designed to fuel long hours on the road. It typically includes lean proteins, whole grains, and a variety of colorful vegetables, ensuring a balanced meal that supports energy and health. The flavor profile is often vibrant, featuring herbs and spices that enhance the natural tastes of the ingredients.

    These meals are crafted to be satisfying yet light, preventing the sluggishness that can come from heavy foods. With options ranging from grilled chicken with quinoa to veggie-packed stir-fries, this healthy dinner ideas for truck drivers caters to diverse palates while promoting overall well-being.

    Why This healthy dinner ideas for truck drivers is a Must-Try

    This healthy dinner ideas for truck drivers is a must-try for anyone looking to maintain energy and focus while on the road. It combines convenience with nutrition, making it an ideal choice for busy lifestyles.

    • Versatile: Can be enjoyed any time of day.
    • Flavor-packed: Bursting with fresh and complementary flavors.
    • Easy to Make: Perfect for both beginners and seasoned cooks.

    Keep reading to discover how you can make this mouthwatering healthy dinner ideas for truck drivers at home!

    Ingredients for healthy dinner ideas for truck drivers

    Ingredients for healthy dinner ideas for truck drivers
    Essential ingredients for nutritious meals on the road.

    Fuel your journey with these essential ingredients.

    Main Ingredients:

    • Lean proteins: Chicken, turkey, or fish for muscle repair.
    • Whole grains: Brown rice or quinoa for sustained energy.
    • Fresh vegetables: Broccoli, bell peppers, and spinach for vitamins.
    • Healthy fats: Avocado or olive oil for heart health.
    • Herbs and spices: Garlic, ginger, and pepper for flavor without calories.

    For the best healthy dinner ideas for truck drivers, choose high-quality lean proteins for optimum flavor.

    Optional Additions & Enhancements:

    • Nuts and seeds: Add for crunch and extra nutrients.
    • Beans or legumes: Boost fiber and protein content.
    • Low-sodium sauces: Enhance taste without excess salt.

    What do you like to add to your healthy dinner ideas for truck drivers? Let us know in the comments!

    How to Make Healthy Dinner Ideas for Truck Drivers

    Healthy dinner ideas for truck drivers
    Ultimate fuel for success on the road.

    Gather Ingredients:
    – Lean protein (chicken, turkey, or fish)
    – Fresh vegetables (broccoli, bell peppers, carrots)
    – Whole grains (quinoa, brown rice)
    – Healthy fats (olive oil, avocado)
    – Spices and herbs (garlic, pepper, basil)
    Preparation:
    – Chop vegetables into bite-sized pieces.
    – Marinate protein in olive oil and spices for at least 30 minutes.
    Cooking Process:
    1. Heat a pan over medium heat.
    2. Add marinated protein and cook until browned.
    3. Toss in chopped vegetables and sauté until tender.
    4. Cook whole grains according to package instructions.
    Assembly/Plating:
    – Serve protein and vegetables over a bed of whole grains.
    – Drizzle with olive oil and sprinkle fresh herbs on top.
    Pro Tips:
    – Tip: For extra crispiness, preheat your pan before adding the ingredients!
    – Tip: Prepare ingredients in advance for a quicker cooking time on the road!

    Variations suggestions and Pairings for healthy dinner ideas for truck drivers

    Truck drivers often need meals that are not only nutritious but also adaptable to their busy lifestyles. Here are some variations and pairings to elevate your healthy dinner ideas.

    Variations:

    Try a spicy version by adding a pinch of chili flakes. For a vegetarian twist, substitute chicken with chickpeas. Use quinoa instead of rice for a protein boost. Swap out broccoli for asparagus for a different flavor. Add a splash of lemon juice for a refreshing zing.

    Customizations:

    Enhance your dish with fresh herbs like cilantro or parsley. Drizzle with a homemade vinaigrette for added flavor. Top with avocado slices for creaminess. Incorporate nuts or seeds for crunch. Use low-sodium soy sauce for an umami kick.

    Serving and Pairings:

    Serve with a side of steamed vegetables for extra nutrients. Pair with a light salad dressed in olive oil. Enjoy with whole-grain bread for added fiber. Complement with herbal tea for a soothing finish. Consider a fruit smoothie for dessert to satisfy your sweet tooth.

    Health Benefits of Healthy Dinner Ideas for Truck Drivers

    Healthy dinner ideas for truck drivers are essential for maintaining energy and focus on the road. These meals are often packed with essential nutrients that support overall well-being. For instance, incorporating lean proteins like chicken or fish provides the body with amino acids necessary for muscle repair and growth. Vegetables rich in vitamins A and C, such as spinach and bell peppers, are loaded with antioxidants that help combat oxidative stress. Whole grains like quinoa or brown rice offer fiber, which aids digestion and keeps you feeling full longer. Packed with protein and fiber, these healthy dinner ideas for truck drivers support a balanced diet.

    Nutritional Value:

    Key ingredients in these meals contribute significantly to health. For example, leafy greens are not only low in calories but also high in vitamins and minerals. Lean meats provide essential nutrients without excess fat, while legumes are a great source of plant-based protein. Choosing nutrient-dense foods ensures that truck drivers stay energized and healthy on long hauls.

    Healthier Choices:

    To make these healthy dinner ideas for truck drivers even better, consider using low-sodium options for sauces and seasonings. Opt for whole grain substitutes instead of refined grains to boost fiber intake. Adding more vegetables can enhance the nutritional profile without adding many calories. Simple swaps can transform a good meal into a great one!

    Grilled fish fillet served with wild rice and sautéed mixed vegetables on a dinner plate
    Aria Belle

    healthy dinner ideas for truck drivers

    Discover healthy dinner ideas for truck drivers that are easy to prepare and packed with nutrients! 🍽️ Fuel your journey with delicious meals.
    Prep Time 30 minutes
    Cook Time 20 minutes
    Total Time 50 minutes
    Servings: 2 servings
    Course: Dinner
    Cuisine: Healthy
    Calories: 450

    Ingredients
      

    Main Ingredients
    • 1 lb Lean protein (chicken, turkey, or fish) For muscle repair.
    • 1 cup Whole grains (brown rice or quinoa) For sustained energy.
    • 2 cups Fresh vegetables (broccoli, bell peppers, spinach) For vitamins.
    Healthy Fats
    • 2 tbsp Olive oil For heart health.
    • 1 medium Avocado For healthy fats.
    Herbs and Spices
    • 2 cloves Garlic For flavor.
    • 1 tsp Ginger For flavor.
    • 1 tsp Pepper For flavor.

    Equipment

    • 1 Pan For cooking protein and vegetables.
    • 1 Cutting Board For chopping vegetables.
    • 1 Knife For cutting ingredients.

    Method
     

    Preparation
    1. Chop vegetables into bite-sized pieces.
    Marination
    1. Marinate protein in olive oil and spices for at least 30 minutes.
    Cooking Process
    1. 1. Heat a pan over medium heat.
      2. Add marinated protein and cook until browned.
      3. Toss in chopped vegetables and sauté until tender.
      4. Cook whole grains according to package instructions.
    Assembly/Plating
    1. Serve protein and vegetables over a bed of whole grains. Drizzle with olive oil and sprinkle fresh herbs on top.

    Notes

    Essential nutrition facts per serving:
    Calories Fat Protein Carbs
    450 15g 35g 50g

    FAQs about healthy dinner ideas for truck drivers

    Here are some common questions regarding healthy dinner ideas tailored for truck drivers.

    Can I substitute ingredients in these recipes?

    Yes, you can substitute ingredients in these recipes to suit your taste or dietary needs. For example, if a recipe calls for quinoa, you can use brown rice or couscous instead. This flexibility allows you to create meals that are both nutritious and enjoyable.

    How long do healthy dinner ideas for truck drivers last in the fridge?

    Typically, healthy dinner ideas can stay fresh in the fridge for 3-5 days when stored properly in an airtight container. This makes it easy to prepare meals in advance and enjoy them throughout the week without worrying about spoilage.

    Can I make healthy dinner ideas for truck drivers ahead of time?

    Absolutely! Preparing healthy dinner ideas in advance can save you time and stress during busy days. In fact, some dishes may even taste better after sitting for a day, as the flavors have time to meld together.

    What are some quick healthy dinner ideas for truck drivers?

    Quick healthy dinner ideas include grilled chicken wraps with veggies, quinoa salad with beans and avocado, or stir-fried vegetables with tofu. These meals are not only nutritious but also easy to prepare, making them perfect for truck drivers on the go.

    Conclusion

    Healthy dinner ideas for truck drivers are essential for maintaining energy and focus on the road. By incorporating nutritious ingredients and quick recipes, you can fuel your journey without sacrificing taste. Remember, a well fed driver is a safe driver! Now it’s your turn! Try this healthy dinner ideas for truck drivers recipe and share your thoughts or favorite twists in the comments below!

  • Peanut Butter and Jelly Burger: The Ultimate Flavor Explosion!

    Peanut Butter and Jelly Burger: The Ultimate Flavor Explosion!

    Imagine sinking your teeth into a juicy, perfectly grilled burger, topped with creamy peanut butter and a luscious layer of sweet jelly. This playful twist on a classic combines savory and sweet in a way that will make your taste buds dance with joy! The rich, nutty flavor of the peanut butter complements the burger’s savory goodness, while the jelly adds a delightful burst of sweetness. Serve it on a toasted bun with fresh lettuce and a sprinkle of crushed peanuts for an unforgettable meal that’s sure to impress family and friends!

    Why You’ll Love Peanut Butter and Jelly Burger

    • It’s a delightful twist on the classic burger you never knew you needed.
    • The creamy peanut butter adds a rich, nutty flavor that pairs perfectly with the sweetness of jelly.
    • It’s a fun and adventurous meal that will impress your friends and family.
    • Quick and easy to make, perfect for busy weeknights or weekend cookouts.
    • It’s a unique way to enjoy your favorite childhood flavors in a grown-up dish!

    Recipe Snapshot

    FeatureDetails
    Category:Burger
    Cuisine:American
    Prep Time:10 minutes
    Cook Time:15 minutes
    Total Time:25 minutes
    Dietary:Vegetarian
    Serves:4
    Best Served:Warm

    Ingredients

    Ingredients for peanut butter and jelly burger displayed on a wooden table.
    Gather all the essentials for your delicious burger!
    • Ground beef – A juicy base for your burger, choose a blend with some fat for extra flavor.
    • Peanut butter – Adds a creamy, nutty richness; opt for smooth or crunchy based on your preference.
    • Jelly – Choose your favorite flavor for a sweet contrast; grape or strawberry works wonderfully.
    • Hamburger buns – Soft and sturdy to hold all the delicious toppings together.
    • Salt and pepper – Essential for seasoning the beef and enhancing all flavors.
    • Optional toppings – Consider adding bacon or pickles for an extra flavor kick!

    Ingredients with measurements will be right under the article in the recipe card.

    How to Make the Recipe

    Step-by-step cooking process for peanut butter and jelly burger with ingredients displayed.
    Follow these steps to create your own peanut butter and jelly burger!

    Get ready for a fun culinary adventure with your Peanut Butter and Jelly Burger! Follow these steps to create a deliciously unique meal.

    Step 1: Gather Your Ingredients

    Collect all the essentials: ground beef or turkey, peanut butter, your favorite jelly, burger buns, lettuce, and optional toppings like pickles or bacon alternatives.

    Step 2: Prepare the Patties

    In a bowl, mix the ground meat with salt and pepper. Shape into patties, making them slightly larger than your buns.

    Step 3: Cook the Patties

    Heat a skillet or grill over medium-high heat. Cook the patties for about 4-5 minutes on each side, or until they reach your desired doneness.

    Step 4: Toast the Buns

    While the patties are cooking, toast the burger buns on a separate pan until golden brown. This adds a delightful crunch!

    Step 5: Assemble the Burger

    Spread a generous layer of peanut butter on the bottom bun. Place the cooked patty on top, followed by a dollop of jelly.

    Step 6: Add Freshness

    Top with lettuce and any other toppings you love. Feel free to get creative!

    Step 7: Serve and Enjoy!

    Cap it off with the top bun, slice in half if you like, and dig in! Enjoy the explosion of flavors!

    Pro Tips for Making Peanut Butter and Jelly Burger

    •Use creamy peanut butter for a smooth texture that spreads easily.
    •Opt for homemade or natural jelly for a fresher taste and fewer additives.
    •Toast the burger bun lightly for added crunch and warmth.
    •Experiment with different types of burgers, like turkey or veggie, for unique flavors.
    •Add a sprinkle of sea salt on top for a delightful sweet and salty contrast.

    How to Serve

    Serving suggestions for peanut butter and jelly burger with various sides.
    Elevate your burger experience with these fun serving ideas!

    Get ready to elevate your peanut butter and jelly burger experience with these fun serving suggestions!

    • Top with crispy bacon for a sweet and salty combo.
    • Add sliced bananas for a fruity twist.
    • Serve with sweet potato fries for a delicious side.
    • Pair with a refreshing cucumber salad to balance the flavors.
    • Drizzle with honey for an extra touch of sweetness.
    • Use a toasted brioche bun for a gourmet feel.
    • Offer a side of pickles for a tangy contrast.
    • Try it with a scoop of vanilla ice cream for dessert vibes.

    Make Ahead and Storage

    Storing Leftovers

    • Allow the burger to cool completely before storing.
    • Wrap each burger tightly in plastic wrap or aluminum foil.
    • Place wrapped burgers in an airtight container.
    • Store in the refrigerator for up to 3 days.

    Freezing

    • Cool the burgers completely before freezing.
    • Wrap each burger in plastic wrap, then in aluminum foil.
    • Place wrapped burgers in a freezer-safe bag or container.
    • Freeze for up to 3 months for best quality.

    Reheating

    • Thaw frozen burgers in the refrigerator overnight.
    • Reheat in a skillet over medium heat for 5-7 minutes per side.
    • Alternatively, use the oven at 350°F (175°C) for 10-15 minutes.
    • Ensure the internal temperature reaches 165°F (74°C) before serving.

    Close-up of a gourmet beef burger with lettuce, tomato, pickles, creamy peanut butter, and berry sauce on a sesame seed bun
    Aria Belle

    peanut butter and jelly burger

    Discover the deliciously unique peanut butter and jelly burger! A fun twist on a classic meal that will tantalize your taste buds! 🍔🥜🍇
    Prep Time 10 minutes
    Cook Time 15 minutes
    Total Time 25 minutes
    Servings: 4 servings
    Course: Burger
    Cuisine: American
    Calories: 500

    Ingredients
      

    Meat
    • 1 lb Ground beef A juicy base for your burger, choose a blend with some fat for extra flavor.
    • 1 tbsp Salt Essential for seasoning the beef.
    • 1 tbsp Pepper Essential for seasoning the beef.
    Toppings
    • 4 slices Bacon (optional) Consider adding for an extra flavor kick!
    • 4 slices Pickles (optional) Consider adding for an extra flavor kick!
    Condiments
    • 4 tbsp Peanut butter Adds a creamy, nutty richness; opt for smooth or crunchy based on your preference.
    • 4 tbsp Jelly Choose your favorite flavor for a sweet contrast; grape or strawberry works wonderfully.
    Buns
    • 4 buns Hamburger buns Soft and sturdy to hold all the delicious toppings together.

    Equipment

    • 1 Skillet or Grill For cooking the patties.
    • 1 Pan For toasting the buns.

    Method
     

    Step 1: Gather Your Ingredients
    1. Collect all the essentials: ground beef or turkey, peanut butter, your favorite jelly, burger buns, lettuce, and optional toppings like pickles or bacon alternatives.
    Step 2: Prepare the Patties
    1. In a bowl, mix the ground meat with salt and pepper. Shape into patties, making them slightly larger than your buns.
    Step 3: Cook the Patties
    1. Heat a skillet or grill over medium-high heat. Cook the patties for about 4-5 minutes on each side, or until they reach your desired doneness.
    Step 4: Toast the Buns
    1. While the patties are cooking, toast the burger buns on a separate pan until golden brown. This adds a delightful crunch!
    Step 5: Assemble the Burger
    1. Spread a generous layer of peanut butter on the bottom bun. Place the cooked patty on top, followed by a dollop of jelly.
    Step 6: Add Freshness
    1. Top with lettuce and any other toppings you love. Feel free to get creative!
    Step 7: Serve and Enjoy!
    1. Cap it off with the top bun, slice in half if you like, and dig in! Enjoy the explosion of flavors!

    FAQs

    What type of meat works best for a peanut butter and jelly burger?

    Ground turkey or chicken are great alternatives to traditional beef. They provide a leaner option while still allowing the peanut butter and jelly flavors to shine through. Just make sure to season them well to enhance the overall taste!

    Can I use a different type of nut butter?

    Absolutely! Almond butter or cashew butter can be delicious substitutes for peanut butter. Each nut butter brings its own unique flavor profile, so feel free to experiment and find your favorite combination!

    What kind of jelly pairs best with this burger?

    Strawberry and grape jelly are classic choices, but don’t hesitate to try raspberry or even fig preserves for a gourmet twist. The key is to choose a jelly that complements the savory notes of the burger.

    How can I make this burger healthier?

    To make your peanut butter and jelly burger healthier, consider using whole grain buns and adding fresh veggies like spinach or avocado. You can also opt for a leaner meat option or a plant-based patty to reduce calories while still enjoying the flavor!

    Final Thoughts

    There you have it the peanut butter and jelly burger! A delightful twist on classic flavors that’s sure to spark joy and nostalgia. It’s simple to whip up and incredibly rewarding to savor. So, gather your ingredients, unleash your inner chef, and dive into this flavor explosion! Trust us, your taste buds will thank you. Enjoy every bite, and don’t forget to share the love with friends!

  • Skillet Cookie

    Skillet Cookie

    Craving something warm, gooey, and utterly delicious? You’re in for a treat with this easy skillet cookie recipe! Imagine a giant cookie, baked to perfection in a skillet, combining rich flavors and simple ingredients that come together in no time. Whether you’re a busy mom looking for a quick dessert or a professional seeking a sweet escape, this skillet cookie is your answer. It’s the perfect way to indulge without the fuss, and trust me, once you try it, you’ll be hooked!

    INTRODUCTION

    What is skillet cookie?

    This skillet cookie is a delightful blend of traditional cookie dough baked in a cast iron skillet. It combines the comforting flavors of brown sugar, butter, and vanilla with the rich texture of chocolate chips. The result is a warm, gooey dessert that is perfect for sharing or indulging alone.

    Typically served straight from the skillet, this dessert offers a unique experience. The edges are slightly crispy, while the center remains soft and chewy. This skillet cookie is not just a treat; it’s an experience that brings people together, making it a favorite for gatherings and cozy nights in.

    Why This skillet cookie is a Must-Try

    This skillet cookie is a must-try for anyone who loves desserts that are both easy to make and incredibly satisfying. Its versatility allows it to be enjoyed at any time of day, whether as a sweet breakfast treat or a late-night snack.

    • Versatile: Can be enjoyed any time of day.
    • Flavor-packed: Bursting with fresh and complementary flavors.
    • Easy to Make: Perfect for both beginners and seasoned cooks.

    Keep reading to discover how you can make this mouthwatering skillet cookie at home!

    Skillet cookie topped with a scoop of vanilla ice cream and chocolate chips
    Aria Belle

    skillet cookie

    Indulge in a warm, gooey skillet cookie that’s perfect for sharing! 🍪✨ Discover the joy of baking this delicious treat today!
    Prep Time 10 minutes
    Cook Time 25 minutes
    Total Time 35 minutes
    Servings: 8 servings
    Course: Dessert
    Cuisine: American
    Calories: 300

    Ingredients
      

    Main Ingredients
    • 1 cup unsalted butter For rich flavor and a gooey texture.
    • 1 cup brown sugar Adds sweetness and moisture.
    • 1/2 cup granulated sugar Balances the sweetness.
    • 2 large eggs Binds the ingredients together.
    • 2 teaspoons vanilla extract Enhances the overall flavor.
    • 2 cups all-purpose flour Provides structure to the cookie.
    • 1 teaspoon baking soda Helps the cookie rise.
    • 1/2 teaspoon salt Balances sweetness and enhances flavor.
    • 1 cup chocolate chips The star of the show for that melty goodness.
    Optional Additions & Enhancements
    • to taste chopped nuts For added crunch and flavor.
    • to taste caramel bits For a sweet surprise.
    • to taste peanut butter Swirl it in for a nutty twist.
    • to taste dried fruit For a chewy texture and natural sweetness.

    Equipment

    • 1 cast-iron skillet For best results.

    Method
     

    Gather Ingredients
    1. 1 cup all-purpose flour, 1/2 teaspoon baking soda, 1/4 teaspoon salt, 1/2 cup unsalted butter, softened, 1/2 cup brown sugar, 1/4 cup granulated sugar, 1 teaspoon vanilla extract, 1 large egg, 1 cup chocolate chips
    Preparation
    1. Preheat your oven to 350°F (175°C). In a bowl, whisk together flour, baking soda, and salt. Set aside.
    Cooking Process
      1. In a large skillet, melt the butter over medium heat.
      2. Add brown sugar and granulated sugar, stirring until well combined.
      3. Mix in the vanilla extract and egg until smooth.
      4. Gradually add the flour mixture, stirring until just combined.
      5. Fold in the chocolate chips.
      6. Spread the cookie dough evenly in the skillet.
      7. Bake for 20-25 minutes or until golden brown.
    Assembly/Plating
    1. Let the skillet cookie cool slightly. Serve warm, topped with ice cream or whipped cream for an extra treat!

    Notes

    Essential nutrition facts per serving:
    Calories Fat Protein Carbs
    300 15g 3g 40g

    Ingredients for skillet cookie

    Ingredients for skillet cookie
    Key ingredients for a delicious skillet cookie.

    Here are the key ingredients you’ll need for a mouthwatering skillet cookie.

    Main Ingredients:

    • 1 cup unsalted butter – For rich flavor and a gooey texture.
    • 1 cup brown sugar – Adds sweetness and moisture.
    • 1/2 cup granulated sugar – Balances the sweetness.
    • 2 large eggs – Binds the ingredients together.
    • 2 teaspoons vanilla extract – Enhances the overall flavor.
    • 2 cups all-purpose flour – Provides structure to the cookie.
    • 1 teaspoon baking soda – Helps the cookie rise.
    • 1/2 teaspoon salt – Balances sweetness and enhances flavor.
    • 1 cup chocolate chips – The star of the show for that melty goodness.

    For the best skillet cookie, choose high-quality chocolate chips for optimum flavor.

    Optional Additions & Enhancements:

    • Chopped nuts – For added crunch and flavor.
    • Caramel bits – For a sweet surprise.
    • Peanut butter – Swirl it in for a nutty twist.
    • Dried fruit – For a chewy texture and natural sweetness.

    What do you like to add to your skillet cookie? Let us know in the comments!

    How to Make Skillet Cookie

    Freshly baked skillet cookie with ice cream
    A warm skillet cookie topped with ice cream, perfect for sharing!

    Making a skillet cookie is easy and fun! Follow these simple steps for a delicious treat.

    Gather Ingredients:

    • 1 cup all-purpose flour
    • 1/2 teaspoon baking soda
    • 1/4 teaspoon salt
    • 1/2 cup unsalted butter, softened
    • 1/2 cup brown sugar
    • 1/4 cup granulated sugar
    • 1 teaspoon vanilla extract
    • 1 large egg
    • 1 cup chocolate chips

    Preparation:

    Preheat your oven to 350°F (175°C). In a bowl, whisk together flour, baking soda, and salt. Set aside.

    Cooking Process:

    1. In a large skillet, melt the butter over medium heat.
    2. Add brown sugar and granulated sugar, stirring until well combined.
    3. Mix in the vanilla extract and egg until smooth.
    4. Gradually add the flour mixture, stirring until just combined.
    5. Fold in the chocolate chips.
    6. Spread the cookie dough evenly in the skillet.
    7. Bake for 20-25 minutes or until golden brown.

    Assembly/Plating:

    Let the skillet cookie cool slightly. Serve warm, topped with ice cream or whipped cream for an extra treat!

    Pro Tips:

    • Tip: For extra crispiness, preheat your pan before adding the ingredients!
    • Tip: Use a cast-iron skillet for the best results.
    • Tip: Customize with nuts or dried fruit for added flavor.

    Variations suggesgtions and Pairings for skillet cookie

    Skillet cookies are incredibly versatile, allowing you to get creative with flavors and ingredients. Here are some fun variations and pairings to elevate your dessert experience!

    Variations:

    Try a spicy version by adding a pinch of chili flakes. For a vegetarian twist, substitute butter with coconut oil. Experiment with different types of chocolate, like dark or white. Add nuts for crunch, such as walnuts or pecans. Incorporate seasonal fruits like apples or berries for a fresh touch.

    Customizations:

    Top your skillet cookie with a scoop of ice cream for a classic dessert. Drizzle caramel or chocolate sauce for added sweetness. Sprinkle sea salt on top to enhance flavors. Serve with whipped cream for a light finish. Add a dash of cinnamon for warmth and spice.

    Serving and Pairings:

    Pair your skillet cookie with a glass of cold milk for a nostalgic treat. Serve alongside a hot cup of coffee for a delightful contrast. Consider a scoop of vanilla ice cream to complement the warm cookie. Fresh fruit salad can add a refreshing balance. A rich chocolate stout can enhance the dessert experience.

    Health Benefits of Skillet Cookie

    Skillet cookies can be a delightful treat that also offers some surprising health benefits. When made with wholesome ingredients, they can provide essential nutrients that contribute to a balanced diet. For instance, using oats in your skillet cookie adds fiber, which aids digestion and keeps you feeling full longer. Nuts, often included in these recipes, are rich in healthy fats, protein, and antioxidants, promoting heart health and reducing inflammation. Packed with protein and fiber, this skillet cookie supports a balanced diet while satisfying your sweet tooth.

    Nutritional Value:

    Key ingredients in a skillet cookie can elevate its nutritional profile. Whole grain flours provide B vitamins and minerals, while dark chocolate chips are loaded with antioxidants that can improve heart health. Adding ingredients like Greek yogurt can boost protein content, making your dessert not just tasty but also nutritious. This means you can enjoy a delicious treat without compromising on health.

    Healthier Choices:

    To make a healthier skillet cookie, consider using whole grain flour instead of all-purpose flour for added fiber and nutrients. You can also substitute refined sugars with natural sweeteners like honey or maple syrup, which offer a lower glycemic index. Incorporating nut butters can enhance flavor while providing healthy fats. For a low-sodium option, be mindful of the salt content in your recipe. These simple swaps can transform your skillet cookie into a nutritious dessert that fits into your busy lifestyle.

    FAQS

    Here are some common questions about recipe that will help you make the most of this delicious dessert.

    Can I substitute chocolate chips in this recipe?

    Yes, you can substitute chocolate chips with white chocolate, butterscotch chips, or even nuts for a different flavor profile. Each option brings its own unique taste and texture, so feel free to experiment!

    How long does skillet cookie last in the fridge?

    Typically, it stays fresh for 3-5 days when stored properly in an airtight container. Just make sure to let it cool completely before refrigerating to maintain its texture.

    Can I make skillet cookie ahead of time?

    Absolutely! Preparing it in advance can even enhance the flavors. Just bake it, let it cool, and store it in the fridge until you’re ready to serve. You can reheat it for that fresh-out-of-the-oven taste!

    What size skillet is best for making a skillet cookie?

    A 10-12 inch cast iron skillet is ideal for making a skillet cookie. This size allows for even baking and gives you that perfect gooey center while achieving a crispy edge.

    Conclusion

    Skillet cookies are the perfect blend of gooey goodness and crispy edges, making them a delightful treat for any occasion. Whether you enjoy them plain or with your favorite toppings, this dessert is sure to impress. It’s quick, easy, and a fun way to bring the family together. Now it’s your turn! Try this recipe and share your thoughts or favorite twists in the comments below! We can’t wait to hear how you make this delicious dessert your own!

  • Garlic Fries: The Ultimate Crispy Delight You Can’t Resist!

    Garlic Fries: The Ultimate Crispy Delight You Can’t Resist!

    Oh, let’s talk about garlic fries! These golden, crispy beauties are tossed in a heavenly mix of fresh garlic, fragrant herbs, and a sprinkle of nutritional yeast for that cheesy vibe without the dairy. Just imagine biting into that crunchy exterior, followed by a soft, fluffy inside, all while the garlic aroma dances around you. Perfect as a snack or a side, they’re so addictive you might just want to keep them all to yourself! Grab some potatoes, fire up that oven, and let’s make your taste buds sing!

    Why You’ll Love This Recipe

    • Trust me, you’re going to love this crispy texture!
    • This one’s a game-changer for your snack game.
    • Simple ingredients make it easy to whip up anytime.
    • Perfectly seasoned for that irresistible garlic flavor.
    • Great as a side dish or a tasty treat on their own!

    Recipe Snapshot

    FeatureDetails
    Category:Appetizer
    Cuisine:American
    Prep Time:10 minutes
    Cook Time:20 minutes
    Total Time:30 minutes
    Dietary:Vegetarian, Vegan
    Serves:4
    Best Served:Hot

    Ingredients

    Ingredients for making garlic fries, including garlic, fries, olive oil, parsley, salt, and Parmesan cheese.
    Essential ingredients for the perfect garlic fries.
    • Garlic – adds a robust flavor; use fresh for the best taste.
    • Fries – choose your favorite type; crispy is key!
    • Olive Oil – helps achieve that perfect golden crisp; extra virgin is a great choice.
    • Parsley – for a fresh, vibrant garnish; chop finely for even distribution.
    • Salt – enhances all the flavors; adjust to your taste preference.
    • Parmesan Cheese – adds a savory, cheesy kick; use freshly grated for the best melt.

    Ingredients with measurements will be right under the article in the recipe card.

    How to Make the Recipe

    A step-by-step guide to making garlic fries, featuring ingredients and preparation methods.
    Step-by-step guide to delicious garlic fries.

    Get ready to whip up some delicious garlic fries that will make your taste buds dance!

    Step 1: Gather Your Ingredients

    Collect 4 large russet potatoes, 4 cloves of garlic, 1/4 cup of olive oil, salt, and fresh parsley.

    Step 2: Prepare the Potatoes

    Wash and peel the potatoes, then cut them into thin strips for that perfect fry shape.

    Step 3: Soak the Fries

    Place the cut fries in a bowl of cold water and let them soak for at least 30 minutes to remove excess starch.

    Step 4: Preheat the Oven

    While the fries are soaking, preheat your oven to 425°F (220°C) for crispy perfection.

    Step 5: Drain and Dry

    Drain the soaked fries and pat them dry with a clean kitchen towel to ensure they crisp up nicely.

    Step 6: Season the Fries

    In a large bowl, toss the fries with olive oil, minced garlic, and a pinch of salt until evenly coated.

    Step 7: Bake the Fries

    Spread the fries in a single layer on a baking sheet and bake for 25-30 minutes, flipping halfway through.

    Step 8: Garnish and Serve

    Once golden and crispy, remove from the oven, sprinkle with fresh parsley, and serve hot. Enjoy your garlic fries!

    Pro Tips for Making the Recipe

    • Use fresh garlic for the best flavor; it makes a world of difference!
    • Soak your fries in cold water for at least 30 minutes to achieve extra crispiness.
    • Experiment with different oils like avocado or sunflower for a unique taste.
    • Don’t overcrowd the baking sheet; give your fries space to crisp up perfectly.
    • Finish with a sprinkle of fresh parsley for a pop of color and freshness!

    How to Serve

    Creative serving suggestions for garlic fries, featuring various toppings and dips.
    Delicious serving ideas for garlic fries.

    Get ready to elevate your garlic fries experience with these fun serving suggestions!

    • Top with freshly grated Parmesan for a cheesy twist.
    • Serve alongside a zesty marinara sauce for dipping.
    • Pair with a creamy garlic aioli for an extra flavor kick.
    • Sprinkle with fresh herbs like parsley or chives for a pop of color.
    • Enjoy with a side of tangy ranch dressing for a classic combo.
    • Mix in some sautéed mushrooms for an earthy flavor boost.
    • Try adding crumbled feta cheese and olives for a Mediterranean flair.
    • Serve with a side of spicy ketchup for a bold taste.
    • Top with avocado slices for a creamy, healthy addition.
    • Pair with a refreshing cucumber salad to balance the richness.

    Make Ahead and Storage

    Storing Leftovers

    • Allow garlic fries to cool completely before storing.
    • Place them in an airtight container.
    • Store in the refrigerator for up to 3 days.
    • Avoid stacking to prevent sogginess.

    Freezing

    • Cool garlic fries completely before freezing.
    • Spread them in a single layer on a baking sheet.
    • Freeze for 1-2 hours until solid.
    • Transfer to a freezer-safe bag or container.
    • Label with the date and use within 2 months.

    Reheating

    • Preheat your oven to 400°F (200°C).
    • Spread fries on a baking sheet in a single layer.
    • Bake for 10-15 minutes until crispy.
    • For microwave reheating, use a paper towel to absorb moisture.

    Crispy French fries topped with marinara sauce, ricotta cheese, and chopped parsley.
    Aria Belle

    garlic fries

    Indulge in the irresistible taste of garlic fries! Perfectly crispy and bursting with flavor, these fries are a must-try! 🍟🧄
    Prep Time 10 minutes
    Cook Time 20 minutes
    Total Time 30 minutes
    Servings: 4 servings
    Course: Appetizer
    Cuisine: American
    Calories: 250

    Ingredients
      

    Potatoes
    • 4 large russet potatoes Washed and peeled.
    • 4 cloves garlic Minced for flavor.
    Oil and Seasoning
    • 1/4 cup olive oil Extra virgin recommended.
    • to taste salt Adjust according to preference.
    • to taste fresh parsley Chopped for garnish.
    • to taste Parmesan cheese Freshly grated for best melt.

    Equipment

    • 1 Baking Sheet For baking the fries.
    • 1 Large Bowl For soaking and mixing the fries.
    • 1 Kitchen towel For drying the fries.

    Method
     

    1. Collect 4 large russet potatoes, 4 cloves of garlic, 1/4 cup of olive oil, salt, and fresh parsley.
    2. Wash and peel the potatoes, then cut them into thin strips for that perfect fry shape.
    3. Place the cut fries in a bowl of cold water and let them soak for at least 30 minutes to remove excess starch.
    4. While the fries are soaking, preheat your oven to 425°F (220°C) for crispy perfection.
    5. Drain the soaked fries and pat them dry with a clean kitchen towel to ensure they crisp up nicely.
    6. In a large bowl, toss the fries with olive oil, minced garlic, and a pinch of salt until evenly coated.
    7. Spread the fries in a single layer on a baking sheet and bake for 25-30 minutes, flipping halfway through.
    8. Once golden and crispy, remove from the oven, sprinkle with fresh parsley, and serve hot. Enjoy your garlic fries!

    FAQs

    What type of potatoes are best for garlic fries?

    For the crispiest garlic fries, use starchy potatoes like Russets. They have a high starch content, which helps achieve that perfect crunch while remaining fluffy inside.

    Can I make garlic fries in an air fryer?

    Absolutely! Air frying garlic fries is a healthier option. Just toss your cut potatoes with olive oil and garlic, then air fry at 400°F for about 15-20 minutes, shaking halfway through for even cooking.

    How can I make garlic fries vegan?

    Making garlic fries vegan is simple! Just use olive oil instead of butter and skip any cheese toppings. You can enhance the flavor with nutritional yeast for a cheesy taste without dairy.

    What can I serve with garlic fries?

    Garlic fries pair wonderfully with a variety of dishes! Serve them alongside burgers, sandwiches, or even as a snack with your favorite dipping sauce like ketchup or aioli for a delicious treat.

    Final Thoughts

    There you have it garlic fries that are crispy, flavorful, and oh-so-easy to make! Just imagine the aroma filling your kitchen as you whip up this delightful treat. Whether you’re enjoying them as a snack or serving them at your next gathering, these fries are sure to bring smiles all around. So grab those potatoes, sprinkle on that garlic, and indulge in this simple yet rewarding dish. Happy frying!

  • Carrots Sticks: The Ultimate Healthy Snack for Everyone!

    Carrots Sticks: The Ultimate Healthy Snack for Everyone!

    Craving a snack that’s both delicious and nutritious? Look no further! This Carrots Sticks recipe is your go-to for a quick, easy, and healthy treat that everyone will love. Whether you’re a busy mom juggling a million tasks or a professional on the go, these vibrant carrot sticks are perfect for satisfying your cravings without the guilt. Packed with flavor and crunch, they make for an exciting addition to your snacking routine. Get ready to enjoy a snack that’s not just good for you, but also fun to eat!

    INTRODUCTION

    What is Carrots Sticks?

    Carrots Sticks are crunchy, vibrant snacks made from fresh carrots, cut into long, thin strips. This Carrots Sticks is a delightful blend of natural sweetness and earthy flavors, making it a favorite among health-conscious snackers. They are not only visually appealing but also packed with nutrients, providing a satisfying crunch that can be enjoyed raw or with dips.

    The main ingredient, carrots, offers a sweet and slightly peppery taste, complemented by a crisp texture. These sticks are often served with hummus, ranch dressing, or enjoyed plain, making them a versatile snack option. Whether you’re at home, at work, or on the go, Carrots Sticks are a delicious way to incorporate more vegetables into your diet.

    Fresh carrot sticks served with hummus and assorted dips on a platter.
    Aria Belle

    Carrots Sticks

    Discover how to make delicious Carrots Sticks! A healthy snack that’s easy to prepare and perfect for any occasion. 🥕✨
    Prep Time 10 minutes
    Cook Time 25 minutes
    Total Time 35 minutes
    Servings: 4 servings
    Course: Side Dish, Snack
    Cuisine: American
    Calories: 80

    Ingredients
      

    Main Ingredients
    • 4 medium Fresh Carrots For the best flavor, choose high-quality carrots.
    • 1 pinch Salt Enhances the natural sweetness of the carrots.
    • 2 tablespoons Olive Oil Adds a nice sheen and helps seasonings stick.
    Optional Additions & Enhancements
    • 1 cup Hummus Perfect for dipping and adds protein.
    • to taste Spices (Paprika or Garlic Powder) For an extra kick.
    • to taste Herbs (Fresh Dill or Parsley) Can brighten the flavor.

    Equipment

    • 1 Baking Sheet For baking the carrot sticks.
    • 1 Mixing bowl For tossing the carrots with oil and seasonings.

    Method
     

    Gather Ingredients
    1. – Fresh carrots
      – Olive oil
      – Salt
      – Pepper
      – Optional: herbs or spices
    Preparation
    1. – Wash and peel the carrots.
      – Cut them into sticks, about 3-4 inches long and 1/4 inch wide.
    Cooking Process
    1. 1. Preheat your oven to 400°F (200°C).
      2. Toss the carrot sticks in a bowl with olive oil, salt, and pepper.
      3. Spread them evenly on a baking sheet.
      4. Bake for 20-25 minutes, turning halfway through, until tender and slightly caramelized.
    Assembly/Plating
    1. – Serve warm as a snack or side dish.
      – Pair with hummus or your favorite dip for extra flavor.
    Pro Tips
    1. – Tip: For extra crispiness, preheat your pan before adding the ingredients!
      – Tip: Experiment with different spices for a unique twist!

    Why This Carrots Sticks is a Must-Try

    This Carrots Sticks is a must-try for anyone looking for a healthy and satisfying snack. Its appeal lies in its simplicity and versatility, making it suitable for any occasion.

    • Versatile: Can be enjoyed any time of day.
    • Flavor-packed: Bursting with fresh and complementary flavors.
    • Easy to Make: Perfect for both beginners and seasoned cooks.

    Keep reading to discover how you can make this mouthwatering Carrots Sticks at home!

    Ingredients

    Ingredients for Carrots Sticks
    All the ingredients needed to make delicious carrot sticks.

    Here’s what you need to make delicious Carrots Sticks!

    Main Ingredients:

    • Fresh Carrots: For the best Carrots Sticks, choose high quality carrots for optimum flavor.
    • Salt: A pinch enhances the natural sweetness of the carrots.
    • Olive Oil: Adds a nice sheen and helps seasonings stick.

    Optional Additions & Enhancements:

    • Hummus: Perfect for dipping and adds protein.
    • Spices: Try paprika or garlic powder for an extra kick.
    • Herbs: Fresh dill or parsley can brighten the flavor.

    What do you like to add to your Carrots Sticks? Let us know in the comments!

    How to Make

    Freshly made carrot sticks with hummus
    Healthy and tasty carrot sticks served with hummus.

    Gather Ingredients:
    – Fresh carrots
    – Olive oil
    – Salt
    – Pepper
    – Optional: herbs or spices

    Preparation:
    – Wash and peel the carrots.
    – Cut them into sticks, about 3-4 inches long and 1/4 inch wide.

    Cooking Process:
    1. Preheat your oven to 400°F (200°C).
    2. Toss the carrot sticks in a bowl with olive oil, salt, and pepper.
    3. Spread them evenly on a baking sheet.
    4. Bake for 20-25 minutes, turning halfway through, until tender and slightly caramelized.

    Assembly/Plating:
    – Serve warm as a snack or side dish.
    – Pair with hummus or your favorite dip for extra flavor.

    Pro Tips:
    – Tip: For extra crispiness, preheat your pan before adding the ingredients!
    – Tip: Experiment with different spices for a unique twist!

    Variations suggesgtions and Pairings for Carrots Sticks

    Carrot sticks are a versatile snack that can be easily customized to suit your taste. Here are some fun variations and pairings to elevate your snacking experience!

    Variations:

    Try a spicy version by adding a pinch of chili flakes. For a vegetarian twist, substitute ranch dressing with hummus. Add a sprinkle of garlic powder for an extra kick. Experiment with different colors by mixing in purple or yellow carrots. Create a sweet version by drizzling with honey or maple syrup.

    Customizations:

    Enhance your carrot sticks with a variety of dips like tzatziki, guacamole, or peanut butter. Add a squeeze of lemon juice for a refreshing zing. Top with sesame seeds or chopped herbs for added flavor. Pair with cheese cubes or nuts for a more filling snack.

    Serving and Pairings:

    Carrot sticks pair wonderfully with a light salad or a bowl of soup. Enjoy them alongside a refreshing smoothie or herbal tea. They also make a great addition to a charcuterie board. For a fun twist, serve with a sparkling water infused with fruit.

    Health Benefits of Carrots Sticks

    Carrots Sticks are not just a crunchy snack; they are a powerhouse of nutrition. Rich in vitamins A, C, and K, these vibrant orange sticks support eye health, boost immunity, and promote healthy skin. Packed with antioxidants, they help combat free radicals, reducing the risk of chronic diseases. High in fiber, Carrots Sticks aid digestion and keep you feeling full longer. Low in calories, they make for a guilt-free snack option that fits perfectly into any healthy eating plan.

    Nutritional Value:

    Each serving of Carrots Sticks is loaded with essential nutrients. Vitamin A is crucial for vision, while vitamin C enhances your immune system. The fiber content not only supports digestive health but also helps maintain a healthy weight. Antioxidants found in carrots contribute to overall wellness, making these sticks a nutritious choice for busy lifestyles.

    Healthier Choices:

    To make your Carrots Sticks even healthier, consider pairing them with low-sodium dips like hummus or yogurt-based dressings. Opt for whole grain crackers on the side for added fiber and nutrients. Avoid high-calorie dressings and stick to simple, natural flavors to keep your snack light and nutritious. These small adjustments can transform your Carrots Sticks into a super healthy snack that everyone can enjoy!

    FAQS about Carrots Sticks

    Here are some common questions about Carrots Sticks that can help you enjoy this healthy snack even more!

    Can I substitute carrots in this recipe?

    Yes, you can substitute carrots with other crunchy vegetables like celery or bell peppers for a different flavor and texture. Each option brings its own unique taste while still providing a satisfying crunch.

    How long do Carrots Sticks last in the fridge?

    Typically, Carrots Sticks stay fresh for 3-5 days when stored properly in an airtight container. To maintain their crispness, make sure to keep them away from moisture.

    Can I make Carrots Sticks ahead of time?

    Absolutely! Preparing Carrots Sticks in advance can save you time during busy days. Just store them in the fridge, and they’ll be ready for snacking whenever you need a quick, healthy option.

    What are some good dips for Carrots Sticks?

    Carrots Sticks pair wonderfully with hummus, ranch dressing, or tzatziki. These dips not only enhance the flavor but also add a fun twist to your snacking experience!

    Conclusion

    Carrots Sticks are not just a snack; they’re a crunchy delight packed with nutrients! Perfect for busy moms and professionals, they offer a quick, healthy option that everyone can enjoy. Whether you dip them in hummus or pair them with a zesty dressing, the possibilities are endless. Now it’s your turn! Try this Carrots Sticks recipe and share your thoughts or favorite twists in the comments below! Let’s inspire each other to make healthy snacking fun and delicious!