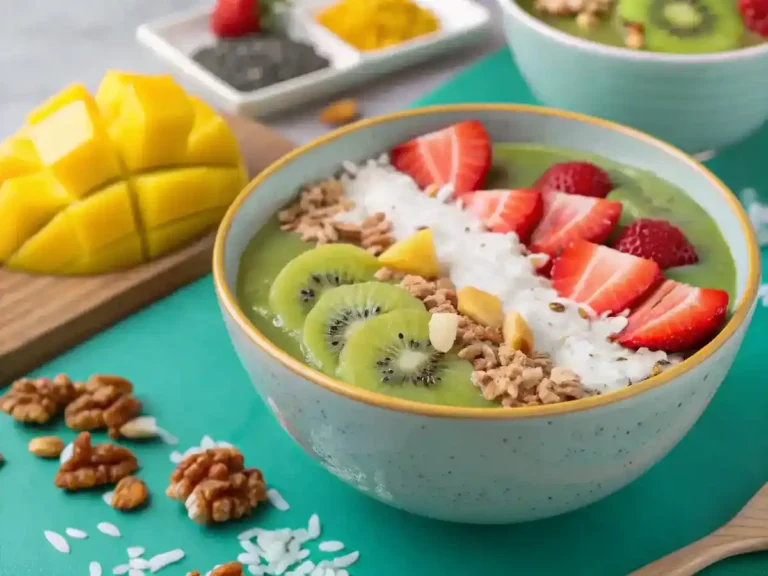
Category: Breakfast

Start your day with flavor and energy! At Recipes Aria, our Breakfast Recipes collection features a wide range of options to suit every taste and lifestyle. Whether you’re looking for quick weekday breakfasts, wholesome meal-prep ideas, or indulgent weekend brunch treats, we’ve got something for everyone. Discover smoothies, pancakes, eggs, vegan options, and more all crafted to help you enjoy the most important meal of the day. Easy to follow, nutritious, and absolutely delicious let’s make your mornings better!

  • Smoothie Bowl

    Smoothie Bowl

    Smoothie Bowl is a vibrant, nourishing delight that transforms your breakfast into a colorful feast! Imagine a creamy blend of ripe bananas, luscious berries, and a splash of almond milk, all topped with crunchy granola, fresh fruit slices, and a sprinkle of chia seeds. This delightful concoction not only tantalizes your taste buds but also fuels your day with wholesome goodness. Perfect for those lazy mornings or a quick pick-me-up, this smoothie bowl is as fun to make as it is to eat. Dive in and savor the deliciousness that awaits you!

    Why You’ll Love This Recipe

    • It’s a vibrant, colorful way to start your day!
    • Packed with nutrients to fuel your morning adventures.
    • Customizable with your favorite fruits and toppings.
    • Quick and easy to whip up in just minutes.
    • Perfect for meal prep or a refreshing snack anytime!
    Creative serving suggestions for a Smoothie Bowl.
    Aria Belle

    Smoothie Bowl

    Start your day with a vibrant Smoothie Bowl! Packed with fruits and greens, it’s a deliciously healthy breakfast option. 🍓🥭
    Prep Time 10 minutes
    Total Time 10 minutes
    Servings: 2 servings
    Course: Breakfast
    Cuisine: Healthy
    Calories: 250

    Ingredients
      

    Base Ingredients
    • 2 cups Frozen Bananas A creamy base that adds natural sweetness.
    • 1 cup Spinach A nutrient powerhouse that blends seamlessly for a vibrant color.
    • ½ cup Almond Milk A dairy-free liquid that keeps the bowl smooth and light.
    • ½ cup Greek Yogurt Adds protein and creaminess for a satisfying texture.
    • 2 tablespoons Chia Seeds A source of omega-3s and fiber that thickens the mixture.
    Toppings
    • to taste Honey or Maple Syrup A touch of natural sweetness to enhance flavor.
    • 1 cup Fresh Berries A colorful topping that adds antioxidants and freshness.
    • ½ cup Granola A crunchy element for texture and added nutrients.
    • 2 tablespoons Coconut Flakes A tropical touch that adds flavor and healthy fats.

    Equipment

    • 1 Blender For blending the smoothie ingredients.

    Method
     

    Step 1: Gather Your Ingredients
    1. Collect your favorite fruits like bananas, berries, and mangoes. Grab some spinach or kale for a green boost. Don’t forget yogurt or a dairy-free alternative, and your choice of milk!
    Step 2: Blend the Base
    1. In a blender, combine 1 cup of your chosen fruits, a handful of greens, ½ cup of yogurt, and ½ cup of milk. Blend until smooth and creamy.
    Step 3: Adjust Consistency
    1. If your smoothie is too thick, add a splash more milk. If it’s too thin, toss in a few more frozen fruits. Blend again until you reach your desired consistency.
    Step 4: Pour and Decorate
    1. Pour your smoothie mixture into a bowl. Now comes the fun part! Top it with sliced fruits, granola, nuts, seeds, or a drizzle of honey.
    Step 5: Enjoy Your Creation
    1. Grab a spoon and dig in! Enjoy every colorful bite of your deliciously healthy Smoothie Bowl.

    Recipe Snapshot

    FeatureDetails
    Category:Breakfast
    Cuisine:Healthy
    Prep Time:10 minutes
    Cook Time:0 minutes
    Total Time:10 minutes
    Dietary:Vegan, Gluten-Free
    Serves:2
    Best Served:Chilled

    Ingredients

    Ingredients for a Smoothie Bowl displayed beautifully.
    Gather your ingredients for a delicious Smoothie Bowl!
    • Frozen Bananas – a creamy base that adds natural sweetness.
    • Spinach – a nutrient powerhouse that blends seamlessly for a vibrant color.
    • Almond Milk – a dairy-free liquid that keeps the bowl smooth and light.
    • Greek Yogurt – adds protein and creaminess for a satisfying texture.
    • Chia Seeds – a source of omega-3s and fiber that thickens the mixture.
    • Honey or Maple Syrup – a touch of natural sweetness to enhance flavor.
    • Fresh Berries – a colorful topping that adds antioxidants and freshness.
    • Granola – a crunchy element for texture and added nutrients.
    • Coconut Flakes – a tropical touch that adds flavor and healthy fats.

    Ingredients with measurements will be right under the article in the recipe card.

    How to Make the Recipe

    Get ready to whip up a delightful Smoothie Bowl that will make your mornings brighter!

    Step 1: Gather Your Ingredients

    Collect your favorite fruits like bananas, berries, and mangoes. Grab some spinach or kale for a green boost. Don’t forget yogurt or a dairy-free alternative, and your choice of milk!

    Step 2: Blend the Base

    In a blender, combine 1 cup of your chosen fruits, a handful of greens, ½ cup of yogurt, and ½ cup of milk. Blend until smooth and creamy.

    Step 3: Adjust Consistency

    If your smoothie is too thick, add a splash more milk. If it’s too thin, toss in a few more frozen fruits. Blend again until you reach your desired consistency.

    Step 4: Pour and Decorate

    Pour your smoothie mixture into a bowl. Now comes the fun part! Top it with sliced fruits, granola, nuts, seeds, or a drizzle of honey.

    Step 5: Enjoy Your Creation

    Grab a spoon and dig in! Enjoy every colorful bite of your deliciously healthy Smoothie Bowl.

    Pro Tips for Making the Recipe

    • Use frozen fruits for a creamier texture and a refreshing chill.
    • Experiment with different nut butters for added flavor and healthy fats.
    • Top with a variety of seeds and nuts for crunch and extra nutrition.
    • Blend in a handful of spinach or kale for a nutrient boost without altering the taste.
    • Adjust the liquid to achieve your desired consistency less for a thicker bowl, more for a smoothie.

    How to Serve

    Get ready to elevate your smoothie bowl experience with these fun serving suggestions!

    • Top with a sprinkle of granola for that satisfying crunch.
    • Add fresh fruits like sliced bananas, berries, or kiwi for a burst of flavor.
    • Drizzle with honey or maple syrup for a touch of sweetness.
    • Include a dollop of nut butter for creaminess and protein.
    • Garnish with chia seeds or flaxseeds for added nutrition.
    • Pair with a side of whole grain toast for a complete breakfast.
    • Serve in a coconut bowl for a tropical vibe.
    • Mix in some shredded coconut for a delightful texture.
    • Top with edible flowers for a beautiful presentation.
    • Enjoy with a refreshing herbal tea or infused water on the side.

    Make Ahead and Storage

    Storing leftovers properly ensures your smoothie bowl stays fresh and delicious.

    Storing Leftovers

    • Transfer leftovers to an airtight container.
    • Store in the refrigerator for up to 2 days.
    • Keep toppings separate to maintain crunchiness.

    Freezing

    • Pour smoothie bowl into freezer-safe containers.
    • Leave some space at the top for expansion.
    • Label with date and contents for easy identification.
    • Freeze for up to 1 month for best quality.

    Reheating

    • Thaw overnight in the refrigerator before reheating.
    • Use a blender to restore smooth texture if needed.
    • Heat gently in a saucepan over low heat, stirring frequently.

    If you enjoy vibrant, nutrient-packed breakfasts, don’t miss our Chia Berry Pudding — another energizing no-cook option that’s just as beautiful and delicious!

    FAQs

    What can I use instead of yogurt in my smoothie bowl?

    If you’re looking for a yogurt substitute, try using dairy-free options like almond milk yogurt or coconut yogurt. These alternatives provide a creamy texture and a delicious flavor while keeping your smoothie bowl healthy and vegan-friendly.

    Can I make my smoothie bowl ahead of time?

    Absolutely! You can prepare your smoothie base in advance and store it in the fridge for up to 24 hours. Just give it a good stir before serving and add your toppings fresh for the best texture and flavor.

    What toppings work best for a smoothie bowl?

    The possibilities are endless! Fresh fruits, granola, nuts, seeds, and even a drizzle of honey or nut butter can elevate your smoothie bowl. Choose toppings that you love and that add a nice crunch or sweetness to balance the smoothie.

    How can I make my smoothie bowl thicker?

    To achieve a thicker consistency, use less liquid when blending your ingredients. You can also add frozen fruits or vegetables, like bananas or spinach, which will help create that perfect, spoonable texture.

    Final Thoughts

    There you have it a delightful Smoothie Bowl that’s as easy to whip up as it is to enjoy! Picture yourself savoring each spoonful, bursting with flavors and colors that remind you of sunny mornings. So grab your favorite toppings, get creative, and make this recipe your own. You’ll find it’s not just a meal; it’s a joyful experience. Happy blending, and enjoy every delicious bite!

  • Iced Collagen Coffee with boiled eggs: The Ultimate Energizing Boost

    Iced Collagen Coffee with boiled eggs: The Ultimate Energizing Boost

    Iced Collagen Coffee with boiled eggs is your new go-to for a delightful morning pick-me-up! Imagine sipping on a creamy, chilled coffee infused with collagen, perfectly paired with velvety boiled eggs that are rich in protein. This dynamic duo not only tantalizes your taste buds but also fuels your day with energy and nourishment. The smooth, refreshing coffee dances on your palate while the eggs provide a satisfying bite, making it a breakfast that’s both indulgent and wholesome. Get ready to elevate your mornings with this deliciously energizing combo!

    Why You’ll Love This Iced Collagen Coffee with boiled eggs

    • Boosts your energy levels with a delicious caffeine kick.
    • Collagen supports healthy skin, hair, and nails hello, glow!
    • Boiled eggs provide a protein-packed start to your day.
    • Refreshing iced coffee is perfect for warm mornings.
    • Easy to prepare, making breakfast a breeze!
    Serving suggestions forIced Collagen Coffee with boiled eggs
    Aria Belle

    Iced Collagen Coffee with boiled eggs

    Discover the perfect energizing combo of Iced Collagen Coffee with boiled eggs
    ! Boost your day with this delicious, nutritious treat! ☕🥚
    Prep Time 5 minutes
    Cook Time 10 minutes
    Total Time 15 minutes
    Servings: 1 serving
    Course: Breakfast
    Cuisine: American
    Calories: 300

    Ingredients
      

    Iced Collagen Coffee
    • 8 ounces Coffee Brewed strong
    • 1 scoop Collagen Powder For added health benefits
    Boiled Eggs
    • 2 eggs Eggs Protein-packed snack
    • 1 cup Almond Milk Dairy-free alternative
    • 1 teaspoon Vanilla Extract For sweetness
    • 1 tablespoon Cocoa Powder For chocolate flavor
    • 1 tablespoon Honey or Maple Syrup Natural sweeteners
    • 1 dash Cinnamon For added spice

    Equipment

    • 1 Pot For boiling eggs
    • 1 Glass For serving iced coffee
    • 1 Spoon For stirring

    Method
     

    Step 1: Brew Your Coffee
    1. Start by brewing a strong cup of your favorite coffee. Aim for about 8 ounces. Let it cool down a bit.
    Step 2: Mix in Collagen
    1. Once your coffee is warm, stir in a scoop of collagen powder until fully dissolved. This will give your drink a boost!
    Step 3: Chill the Coffee
    1. Pour the coffee into a glass filled with ice. Let it chill while you prepare the eggs.
    Step 4: Boil the Eggs
    1. In a pot, bring water to a boil. Gently add your eggs and boil for about 9-12 minutes, depending on how firm you like the yolk.
    Step 5: Cool the Eggs
    1. Once done, transfer the eggs to an ice bath to cool for a few minutes. This makes peeling easier!
    Step 6: Peel and Season
    1. Peel the eggs and sprinkle with a pinch of salt and pepper, or your favorite seasoning for extra flavor.
    Step 7: Enjoy Your Meal
    1. Grab your iced collagen coffee and boiled eggs. Enjoy this energizing combo to kickstart your day!

    Recipe Snapshot

    FeatureDetails
    Category:Breakfast
    Cuisine:American
    Prep Time:5 minutes
    Cook Time:10 minutes
    Total Time:15 minutes
    Dietary:Gluten-free, High-protein
    Serves:1
    Best Served:Chilled

    Ingredients

    Ingredients for Iced Collagen Coffee with boiled eggs displayed on a kitchen counter.
    Gather these ingredients for a nutritious meal!
    • Iced Collagen Coffee – A delicious blend that supports skin elasticity and joint health.
    • Boiled Eggs – A protein-packed snack that keeps you full and energized.
    • Almond Milk – A dairy-free alternative that adds creaminess without the calories.
    • Vanilla Extract – A hint of sweetness that enhances the flavor of your iced coffee.
    • Cocoa Powder – Adds a rich chocolate flavor and antioxidants to your drink.
    • Honey or Maple Syrup – Natural sweeteners to customize your drink’s sweetness.
    • Cinnamon – A dash of spice that boosts metabolism and adds warmth.

    Ingredients with measurements will be right under the article in the recipe card.

    How to Make the Iced Collagen Coffee with boiled eggs

    Get ready to whip up a delicious and energizing treat! Follow these steps for your Iced Collagen Coffee and Boiled Eggs.

    Step 1: Brew Your Coffee

    Start by brewing a strong cup of your favorite coffee. Aim for about 8 ounces. Let it cool down a bit.

    Step 2: Mix in Collagen

    Once your coffee is warm, stir in a scoop of collagen powder until fully dissolved. This will give your drink a boost!

    Step 3: Chill the Coffee

    Pour the coffee into a glass filled with ice. Let it chill while you prepare the eggs.

    Step 4: Boil the Eggs

    In a pot, bring water to a boil. Gently add your eggs and boil for about 9-12 minutes, depending on how firm you like the yolk.

    Step 5: Cool the Eggs

    Once done, transfer the eggs to an ice bath to cool for a few minutes. This makes peeling easier!

    Step 6: Peel and Season

    Peel the eggs and sprinkle with a pinch of salt and pepper, or your favorite seasoning for extra flavor.

    Step 7: Enjoy Your Meal

    Grab your Iced Collagen Coffee with boiled eggs. Enjoy this energizing combo to kickstart your day!

    Pro Tips for Making the Iced Collagen Coffee with boiled eggs

    • Use cold brew coffee for a smoother taste and less acidity.
    • Experiment with flavored collagen powders for a unique twist.
    • Add a pinch of cinnamon or vanilla extract for extra flavor.
    • Boil eggs in advance and store them in the fridge for quick snacks.
    • Pair with a side of fresh fruit for a balanced meal.

    How to Serve

    Enjoy your Iced Collagen Coffee with boiled eggs with these fun serving suggestions:

    • Top your iced coffee with a sprinkle of cinnamon for a warm spice kick.
    • Pair with avocado toast for a creamy, nutritious side.
    • Add a dash of vanilla extract to your coffee for a sweet twist.
    • Serve boiled eggs with a side of fresh salsa for a zesty flavor boost.
    • Mix in a scoop of your favorite protein powder for an extra energizing punch.
    • Garnish your coffee with whipped coconut cream for a decadent touch.
    • Enjoy with a handful of mixed nuts for a satisfying crunch.
    • Try a splash of almond milk in your coffee for a nutty flavor.

    Make Ahead and Storage

    Storing leftovers properly ensures you can enjoy your Iced Collagen Coffee with boiled eggs later without losing quality.

    Storing Leftovers

    • Allow the coffee to cool before storing.
    • Use an airtight container for the boiled eggs.
    • Store the coffee in the fridge for up to 3 days.
    • Keep boiled eggs in their shells for freshness.
    • Consume boiled eggs within a week for best quality.

    Freezing

    • Iced Collagen Coffee is best enjoyed fresh; freezing is not recommended.
    • If necessary, freeze brewed coffee in ice cube trays.
    • Boiled eggs can be frozen, but texture may change.
    • Peel and slice boiled eggs before freezing for easier use later.

    Reheating

    • Reheat boiled eggs gently in warm water.
    • Avoid microwaving boiled eggs to prevent rubbery texture.
    • For coffee, reheat on the stove or in the microwave.
    • Add ice after reheating for a refreshing iced drink.

    FAQs

    What are the benefits of adding collagen to my iced coffee?

    Adding collagen to your iced coffee can enhance skin elasticity, improve joint health, and promote overall wellness. It’s a great way to boost your morning routine with added nutrients!

    How do I make the perfect boiled eggs?

    For perfectly boiled eggs, start with cold water and bring it to a boil. Once boiling, reduce the heat and simmer for about 9-12 minutes, depending on your desired yolk consistency. Then, cool them in ice water for easy peeling!

    Can I customize the flavor of my iced collagen coffee?

    Absolutely! You can add flavors like vanilla, cocoa, or even a dash of cinnamon to personalize your iced collagen coffee. Experiment with different sweeteners or milk alternatives to find your perfect blend!

    Is this recipe suitable for meal prep?

    Yes! You can prepare your boiled eggs in advance and store them in the fridge. Just make your iced collagen coffee fresh when you’re ready to enjoy it for the best taste and texture!

    Final Thoughts

    There you have it, friends! Iced Collagen Coffee paired with boiled eggs is not just a meal; it’s a delightful experience that fuels your day. Imagine sipping that creamy, energizing coffee while enjoying the satisfying crunch of perfectly boiled eggs. It’s simple, rewarding, and oh-so-delicious! So, why not treat yourself to this delightful combo? You deserve it go ahead and indulge in this energizing boost!

  • Chia Berry Pudding: The Ultimate Healthy Delight Recipe

    Chia Berry Pudding: The Ultimate Healthy Delight Recipe

    Chia Berry Pudding is a delightful treat that combines the nutty goodness of chia seeds with the vibrant flavors of fresh berries. This creamy, dreamy dessert is not only a feast for the eyes but also a powerhouse of nutrients! Simply mix chia seeds with almond milk and a touch of maple syrup, then let it set until it transforms into a luscious pudding. Top it off with a medley of juicy strawberries, blueberries, and raspberries for a burst of flavor in every spoonful. Indulge guilt-free in this wholesome delight!

    Why You’ll Love This Recipe

    • It’s a quick and easy breakfast that you can prep the night before.
    • Packed with antioxidants from fresh berries for a health boost.
    • Rich in omega-3 fatty acids thanks to chia seeds, promoting heart health.
    • Customizable with your favorite fruits and sweeteners for a personal touch.
    • Perfectly satisfying and guilt-free, making it a delightful treat!
    Chia Berry Pudding topped with honey and nuts.
    Aria Belle

    Chia Berry Pudding

    Indulge in a delicious and healthy Chia Berry Pudding naturally! Perfect for breakfast or a snack, it’s easy to make and oh-so-tasty! 🍓🥄
    Prep Time 10 minutes
    Total Time 2 minutes
    Servings: 4 servings
    Course: Dessert
    Cuisine: Healthy
    Calories: 150

    Ingredients
      

    Base Ingredients
    • 1/4 cup Chia Seeds A powerhouse of omega-3 fatty acids and fiber.
    • 1 cup Almond Milk A creamy, dairy-free base.
    • 1 tablespoon Maple Syrup Natural sweetener.
    Berries
    • 1 cup Mixed Berries Fresh or frozen, for antioxidants.
    • 1 teaspoon Vanilla Extract Adds warmth and depth.
    • 1/2 cup Greek Yogurt Optional, for added creaminess.

    Equipment

    • 1 Mixing bowl For combining ingredients.
    • Serving cups or jars Serving Containers For chilling and serving the pudding.

    Method
     

    Step 1: Gather Your Ingredients
    1. Collect 1/4 cup of chia seeds, 1 cup of almond milk, 1 tablespoon of maple syrup, and a mix of your favorite berries.
    Step 2: Mix the Base
    1. In a mixing bowl, combine the chia seeds, almond milk, and maple syrup. Stir well until everything is nicely blended.
    Step 3: Let It Sit
    1. Cover the bowl and let it sit for about 10 minutes. This allows the chia seeds to absorb the liquid and swell up.
    Step 4: Stir Again
    1. After 10 minutes, give the mixture another good stir to break up any clumps. It should be thick and creamy!
    Step 5: Add the Berries
    1. Gently fold in your favorite berries, like strawberries, blueberries, or raspberries. Mix them in for a fruity burst!
    Step 6: Chill Out
    1. Transfer the pudding into serving cups or jars. Cover and refrigerate for at least 2 hours, or overnight for the best texture.
    Step 7: Serve and Enjoy!
    1. Once chilled, top with extra berries or a sprinkle of nuts. Dig in and enjoy your delightful Chia Berry Pudding!

    Recipe Snapshot

    FeatureDetails
    Category:Dessert
    Cuisine:Healthy
    Prep Time:10 minutes
    Cook Time:0 minutes
    Total Time:2 hours (including chilling)
    Dietary:Vegan, Gluten-Free
    Serves:4
    Best Served:Chilled

    Ingredients

    • Chia Seeds – a powerhouse of omega-3 fatty acids and fiber, perfect for thickening the pudding.
    • Almond Milk – a creamy, dairy-free base that adds a subtle nutty flavor.
    • Maple Syrup – a natural sweetener that enhances the overall taste without refined sugars.
    • Mixed Berries – fresh or frozen, they provide antioxidants and a burst of flavor.
    • Vanilla Extract – a splash adds warmth and depth to the pudding.
    • Greek Yogurt – optional, for added creaminess and protein boost.

    Ingredients with measurements will be right under the article in the recipe card.

    How to Make the chia berry pudding

    Get ready to whip up a delicious Chia Berry Pudding that’s not only healthy but also super fun to make!

    Step 1: Gather Your Ingredients

    Collect 1/4 cup of chia seeds, 1 cup of almond milk, 1 tablespoon of maple syrup, and a mix of your favorite berries.

    Step 2: Mix the Base

    In a mixing bowl, combine the chia seeds, almond milk, and maple syrup. Stir well until everything is nicely blended.

    Step 3: Let It Sit

    Cover the bowl and let it sit for about 10 minutes. This allows the chia seeds to absorb the liquid and swell up.

    Step 4: Stir Again

    After 10 minutes, give the mixture another good stir to break up any clumps. It should be thick and creamy!

    Step 5: Add the Berries

    Gently fold in your favorite berries, like strawberries, blueberries, or raspberries. Mix them in for a fruity burst!

    Step 6: Chill Out

    Transfer the pudding into serving cups or jars. Cover and refrigerate for at least 2 hours, or overnight for the best texture.

    Step 7: Serve and Enjoy!

    Once chilled, top with extra berries or a sprinkle of nuts. Dig in and enjoy your delightful Chia Berry Pudding!

    Pro Tips for Making the Recipe

    • Use fresh berries for a burst of flavor and vibrant color.
    • Let the chia seeds soak overnight for a creamier texture.
    • Experiment with different plant-based milks for unique tastes.
    • Add a touch of vanilla extract for extra sweetness and aroma.
    • Top with nuts or granola for added crunch and nutrition.

    How to Serve

    • Top with fresh berries for a burst of flavor.
    • Add a drizzle of honey or maple syrup for sweetness.
    • Sprinkle with nuts or seeds for a crunchy texture.
    • Layer with yogurt for a creamy twist.
    • Serve in mason jars for a cute, portable option.
    • Pair with a side of sliced bananas or apples.
    • Enjoy with a dollop of coconut whipped cream for indulgence.
    • Mix in a scoop of protein powder for an extra boost.
    • Garnish with mint leaves for a refreshing touch.
    • Use as a filling for crepes or pancakes for a fun breakfast.

    Make Ahead and Storage

    Proper storage ensures your Chia Berry Pudding stays fresh and delicious!

    Storing Leftovers

    • Allow pudding to cool completely before storing.
    • Transfer to an airtight container.
    • Store in the refrigerator for up to 5 days.
    • Keep toppings separate until serving.

    Freezing

    • Use freezer-safe containers or bags.
    • Portion out servings for easy thawing.
    • Leave some space for expansion.
    • Label with date for reference.

    Reheating

    • Thaw overnight in the refrigerator.
    • Stir well before serving.
    • Add a splash of almond milk for creaminess.
    • Enjoy cold or at room temperature.

    FAQs

    What are the health benefits of Chia Berry Pudding?

    Chia seeds are packed with omega-3 fatty acids, fiber, and protein, making them a fantastic addition to your diet. Combined with berries, which are rich in antioxidants, this pudding not only satisfies your sweet tooth but also supports overall health and wellness.

    Can I use different types of berries in this recipe?

    Absolutely! Feel free to mix and match your favorite berries, such as strawberries, blueberries, or raspberries. Each type of berry brings its unique flavor and nutritional benefits, so get creative and enjoy the variety!

    How long does Chia Berry Pudding last in the fridge?

    Your Chia Berry Pudding can last up to five days in the refrigerator. Just make sure to store it in an airtight container to keep it fresh and delicious for your daily snacking or breakfast needs.

    Can I make this pudding vegan-friendly?

    Yes! This chia berry pudding is naturally vegan as it uses plant-based ingredients. Just ensure that any sweeteners or toppings you choose are also vegan-friendly, and you’ll have a delightful treat that everyone can enjoy!

    Final Thoughts

    There you have it your delightful Chia Berry Pudding is ready to shine! This simple, nutritious treat is not just a feast for the eyes but also a joy for the taste buds. So grab your favorite berries, mix it up, and indulge in this creamy goodness. Remember, every spoonful is a step towards a healthier you. Enjoy every bite, and don’t forget to share the love with friends!

  • Hot Chocolate with Mexican Chocolate: The Ultimate Cozy Delight

    Hot Chocolate with Mexican Chocolate: The Ultimate Cozy Delight

    Hot chocolate with Mexican chocolate is a warm hug in a mug, perfect for chilly evenings. Imagine rich, velvety chocolate blended with a hint of cinnamon and a touch of vanilla, creating a symphony of flavors that dance on your palate. This delightful drink is made with creamy milk and sweetened with a dash of maple syrup, ensuring every sip is pure bliss. Top it off with a sprinkle of chili powder for a playful kick, and you have a cozy treat that warms both heart and soul. Enjoy this irresistible indulgence!

    Why You’ll Love This Recipe

    • Experience the rich, authentic flavor of Mexican chocolate that warms your soul.
    • Indulge in a creamy, velvety texture that makes every sip a cozy hug.
    • Enjoy a delightful hint of spice that adds a unique twist to your classic hot chocolate.
    • Perfect for chilly evenings, this recipe is your go-to comfort drink.
    • Easy to make with simple ingredients, bringing a taste of Mexico to your home.
    A beautifully served cup of hot chocolate with Mexican chocolate, garnished with whipped cream and chocolate shavings.
    Aria Belle

    hot chocolate with mexican chocolate

    Indulge in a cozy cup of hot chocolate with Mexican chocolate! Discover the perfect recipe for a warm, comforting drink. ☕️🍫
    Prep Time 10 minutes
    Cook Time 15 minutes
    Total Time 25 minutes
    Servings: 4 servings
    Course: Beverage
    Cuisine: Mexican
    Calories: 250

    Ingredients
      

    Base Ingredients
    • 2 cups milk Use whole or your favorite non-dairy alternative.
    • 2 tablespoons Mexican chocolate Like Abuelita or Ibarra.
    Sweeteners and Spices
    • 1 tablespoon sugar Adjust to taste.
    • 1 pinch cinnamon Use ground or a cinnamon stick for infusion.
    • 1 splash vanilla extract A little goes a long way.
    Toppings
    • as desired whipped cream Consider using dairy-free options if needed.
    • as desired marshmallows A classic addition for extra sweetness.

    Equipment

    • 1 Small saucepan For heating the milk.
    • 1 whisk or milk frother Optional for frothing the hot chocolate.

    Method
     

    Step 1: Gather Your Ingredients
    1. Collect 2 cups of milk, 2 tablespoons of Mexican chocolate, 1 tablespoon of sugar, a pinch of cinnamon, and a splash of vanilla extract.
    Step 2: Heat the Milk
    1. In a small saucepan, pour in the milk and heat it over medium-low heat. Stir gently to prevent it from scorching.
    Step 3: Add the Chocolate
    1. Once the milk is warm (but not boiling!), add the Mexican chocolate. Stir continuously until the chocolate is fully melted and combined.
    Step 4: Sweeten and Spice It Up
    1. Add the sugar, cinnamon, and vanilla extract. Stir well to blend all the flavors together. Taste and adjust sweetness if needed.
    Step 5: Froth It Up (Optional)
    1. If you like a frothy texture, use a whisk or a milk frother to whip the hot chocolate until it’s light and airy.
    Step 6: Serve and Enjoy
    1. Pour your delicious hot chocolate into your favorite mug. Top with whipped cream or marshmallows if you’re feeling extra indulgent. Sip and savor the cozy goodness!

    Recipe Snapshot

    FeatureDetails
    Category:Beverage
    Cuisine:Mexican
    Prep Time:10 minutes
    Cook Time:15 minutes
    Total Time:25 minutes
    Dietary:Vegetarian
    Serves:4
    Best Served:Warm

    Ingredients

    Ingredients for hot chocolate with Mexican chocolate, including Mexican chocolate, milk, sugar, cinnamon, and vanilla extract.
    Gather your ingredients for the perfect hot chocolate!
    • Mexican chocolate – adds a rich, authentic flavor with a hint of cinnamon.
    • Milk – creates a creamy base; use whole or your favorite non-dairy alternative.
    • Sugar – sweetens the drink; adjust to your taste preference.
    • Cinnamon – enhances the warmth and spice; use ground or a cinnamon stick for infusion.
    • Vanilla extract – adds depth and aroma; a little goes a long way.
    • Whipped cream – for a delightful topping; consider using dairy-free options if needed.
    • Marshmallows – a classic addition for extra sweetness and fun.

    Ingredients with measurements will be right under the article in the recipe card.

    How to Make the Recipe

    A steaming cup of hot chocolate with Mexican chocolate, surrounded by cinnamon sticks and chocolate bars.
    Warm up with this delicious hot chocolate!

    Get ready to indulge in a cozy cup of hot chocolate with a delightful twist of Mexican chocolate! Follow these simple steps to create a warm and inviting drink that will wrap you in comfort.

    Step 1: Gather Your Ingredients

    Collect 2 cups of milk (or your favorite non-dairy milk), 2 tablespoons of Mexican chocolate (like Abuelita or Ibarra), 1 tablespoon of sugar (adjust to taste), a pinch of cinnamon, and a splash of vanilla extract.

    Step 2: Heat the Milk

    In a small saucepan, pour in the milk and heat it over medium-low heat. Stir gently to prevent it from scorching.

    Step 3: Add the Chocolate

    Once the milk is warm (but not boiling!), add the Mexican chocolate. Stir continuously until the chocolate is fully melted and combined.

    Step 4: Sweeten and Spice It Up

    Add the sugar, cinnamon, and vanilla extract. Stir well to blend all the flavors together. Taste and adjust sweetness if needed.

    Step 5: Froth It Up (Optional)

    If you like a frothy texture, use a whisk or a milk frother to whip the hot chocolate until it’s light and airy.

    Step 6: Serve and Enjoy

    Pour your delicious hot chocolate into your favorite mug. Top with whipped cream or marshmallows if you’re feeling extra indulgent. Sip and savor the cozy goodness!

    Pro Tips for Making the Recipe

    • Use high-quality Mexican Chocolate for the best flavor. Look for brands like Abuelita or Ibarra.
    • For a richer taste, add a pinch of cinnamon or a dash of vanilla extract.
    • Whisk vigorously to create a frothy texture; it makes the drink feel extra special.
    • Serve with a dollop of whipped cream or marshmallows for a cozy touch.
    • Experiment with a splash of almond milk for a nutty twist on the classic recipe.

    How to Serve

    Enjoy your hot chocolate with Mexican chocolate in these delightful ways:

    • Top with whipped cream and a sprinkle of cinnamon for a creamy finish.
    • Add a dash of vanilla extract for an extra layer of flavor.
    • Serve with a side of churros for a sweet, crunchy treat.
    • Pair with a slice of tres leches cake for a rich dessert experience.
    • Garnish with chocolate shavings or a cinnamon stick for a beautiful presentation.
    • Mix in a spoonful of peanut butter for a nutty twist.
    • Serve in festive mugs for a cozy gathering with friends.
    • Drizzle with caramel sauce for a sweet surprise.

    Make Ahead and Storage

    Storing Leftovers

    • Allow the hot chocolate to cool completely before storing.
    • Transfer to an airtight container.
    • Store in the refrigerator for up to 3 days.
    • Label the container with the date for easy tracking.

    Freezing

    • Pour cooled hot chocolate into freezer-safe containers.
    • Leave some space at the top for expansion.
    • Seal tightly and label with the date.
    • Freeze for up to 2 months for best quality.

    Reheating

    • Thaw frozen hot chocolate in the refrigerator overnight.
    • Reheat on the stovetop over low heat, stirring gently.
    • Add a splash of milk or water if it’s too thick.
    • Heat until warmed through, but do not boil.

    FAQs

    What is Mexican chocolate?

    Mexican chocolate is a unique blend of cocoa, sugar, and spices, often including cinnamon and vanilla. It has a rich, complex flavor that adds depth to hot chocolate, making it a delightful treat.

    Can I make hot chocolate with Mexican chocolate vegan?

    Absolutely! You can use plant-based milk like almond, oat, or coconut milk instead of dairy milk. Just ensure the Mexican chocolate you choose is dairy-free for a fully vegan experience.

    How can I enhance the flavor of my hot chocolate?

    Consider adding a pinch of cayenne pepper for a spicy kick or a splash of vanilla extract for extra warmth. Toppings like whipped cream, marshmallows, or a sprinkle of cinnamon can also elevate your drink.

    Can I store leftover hot chocolate?

    Yes, you can store leftover hot chocolate in the refrigerator for up to three days. Just reheat it gently on the stove or in the microwave, stirring well before serving.

    Final Thoughts

    As you sip on your homemade hot chocolate with Mexican chocolate, let the warmth wrap around you like a cozy blanket. This delightful treat is not just a drink; it’s a hug in a mug! So gather your loved ones, share some laughs, and enjoy the simple pleasure of this recipe. You’ll find it’s a rewarding experience that brings a little magic to your day!

  • Fruit and Nut Bowl with Honey Drizzle

    Fruit and Nut Bowl with Honey Drizzle

    Fruit and Nut Bowl with Honey Drizzle is a delightful medley that dances on your taste buds! Imagine vibrant, juicy berries, crisp apples, and creamy bananas mingling with a handful of crunchy nuts, all drizzled with golden honey that adds a touch of sweetness. This wholesome bowl is not just a feast for the eyes but also a nourishing treat that fuels your day. Perfect for breakfast or a snack, it’s a simple yet indulgent way to enjoy nature’s candy. Dive in and savor the goodness of this healthy delight!

    Why You’ll Love This Fruit and Nut Bowl

    • It’s a vibrant mix of flavors that will brighten your day.
    • Packed with nutrients, it’s a guilt free snack you can enjoy anytime.
    • The honey drizzle adds a touch of sweetness that feels indulgent.
    • Perfect for sharing or as a quick, healthy breakfast option.
    • Customizable with your favorite fruits and nuts for endless variety.
    Different serving suggestions for Fruit & Nut Bowl with Honey Drizzle.
    Aria Belle

    Fruit and Nut Bowl with Honey Drizzle

    Indulge in a deliciously healthy Fruit and Nut Bowl with Honey Drizzle! Perfect for snacks or light meals. 🍯🍌🥜
    Prep Time 10 minutes
    Total Time 10 minutes
    Servings: 2 servings
    Course: Snack
    Cuisine: Healthy
    Calories: 250

    Ingredients
      

    Fruits
    • 1 banana Banana Sliced into bite-sized pieces.
    • 1 cup Berries A mix of strawberries, blueberries, or raspberries.
    • 1 apple Apple Sliced into bite-sized pieces.
    Nuts
    • 1/2 cup Assorted Nuts Almonds, walnuts, cashews, or your favorites.
    • 2 tablespoons Honey For drizzling over the bowl.
    • 1 tablespoon Chia Seeds For added nutrition.
    • 1 teaspoon Cinnamon For sprinkling on top.

    Equipment

    • 1 Serving Bowl For assembling the fruit and nut bowl.
    • 1 Mixing bowl For mixing the nuts.
    • 1 Knife For slicing fruits.
    • 1 Spoon For serving.

    Method
     

    Step 1: Gather Your Ingredients
    1. Collect fresh fruits like bananas, berries, and apples. Grab a mix of nuts such as almonds, walnuts, and cashews. Don’t forget the honey and a sprinkle of cinnamon!
    Step 2: Prepare the Fruits
    1. Wash your fruits thoroughly. Slice the bananas and apples into bite-sized pieces. Toss in a handful of berries for a colorful touch!
    Step 3: Mix the Nuts
    1. In a bowl, combine your chosen nuts. Feel free to chop them a bit for easier munching. This adds a lovely crunch!
    Step 4: Assemble the Bowl
    1. In a serving bowl, layer the fruits and nuts. Start with a base of fruits, then sprinkle the nuts on top. Make it as colorful as you like!
    Step 5: Drizzle with Honey
    1. Take your honey and drizzle it generously over the top. Let it cascade down the fruits and nuts for that sweet touch!
    Step 6: Add a Dash of Cinnamon
    1. Sprinkle a pinch of cinnamon over the bowl. This adds warmth and a hint of spice to your delightful creation!
    Step 7: Serve and Enjoy!
    1. Grab a spoon and dig in! Enjoy your healthy Fruit and Nut Bowl with Honey Drizzle as a snack or a light meal. Yum!

    Recipe Snapshot

    FeatureDetails
    Category:Snack
    Cuisine:Healthy
    Prep Time:10 minutes
    Cook Time:0 minutes
    Total Time:10 minutes
    Dietary:Vegan, Gluten-Free
    Serves:2
    Best Served:Chilled

    Ingredients for Fruit and Nut Bowl

    Ingredients for Fruit and Nut Bowl with Honey Drizzle laid out on a wooden table.
    Fresh and nutritious ingredients for a healthy bowl.
    • Mixed Fresh Fruits – a colorful variety adds natural sweetness and essential vitamins.
    • Assorted Nuts – provides healthy fats and a satisfying crunch; choose your favorites!
    • Honey – a natural sweetener that enhances flavor and adds a touch of richness.
    • Greek Yogurt – creamy texture and a protein boost; perfect for drizzling or dipping.
    • Chia Seeds – packed with omega-3s and fiber; sprinkle for added nutrition.
    • Cinnamon – a dash adds warmth and depth to the flavors.

    Instructions:

    1. Toss fruit and nuts together in a bowl.
    2. Drizzle with honey and enjoy immediately.

    Why it works: Naturally sweet and nutrient-dense.

    Ingredients with measurements will be right under the article in the recipe card.

    How to Make the Fruit and Nut Bowl

    A finished Fruit and Nut Bowl with Honey Drizzle, ready to be served.
    The ultimate healthy delight!

    Creating your Fruit and Nut Bowl with Honey Drizzle is a delightful experience! Follow these simple steps to whip up this healthy treat.

    Chop up fresh fruit like apples, pears, or berries and mix with walnuts or almonds. Add a drizzle of raw honey and a sprinkle of cinnamon for extra flavor.

    Step 1: Gather Your Ingredients

    Collect fresh fruits like bananas, berries, and apples. Grab a mix of nuts such as almonds, walnuts, and cashews. Don’t forget the honey and a sprinkle of cinnamon!

    Step 2: Prepare the Fruits

    Wash your fruits thoroughly. Slice the bananas and apples into bite-sized pieces. Toss in a handful of berries for a colorful touch!

    Step 3: Mix the Nuts

    In a bowl, combine your chosen nuts. Feel free to chop them a bit for easier munching. This adds a lovely crunch!

    Step 4: Assemble the Bowl

    In a serving bowl, layer the fruits and nuts. Start with a base of fruits, then sprinkle the nuts on top. Make it as colorful as you like!

    Step 5: Drizzle with Honey

    Take your honey and drizzle it generously over the top. Let it cascade down the fruits and nuts for that sweet touch!

    Step 6: Add a Dash of Cinnamon

    Sprinkle a pinch of cinnamon over the bowl. This adds warmth and a hint of spice to your delightful creation!

    Step 7: Serve and Enjoy!

    Grab a spoon and dig in! Enjoy your healthy Fruit and Nut Bowl with Honey Drizzle as a snack or a light meal. Yum!

    Pro Tips for Making the Fruit and Nut Bowl

    • Use a mix of seasonal fruits for the freshest flavors.
    • Toast the nuts lightly to enhance their crunch and aroma.
    • Drizzle honey just before serving to keep it from soaking into the fruits.
    • Experiment with different nut varieties for added texture and taste.
    • Consider adding a sprinkle of cinnamon for a warm, inviting twist.

    How to Serve Fruit and Nut Bowl

    • Serve in a vibrant bowl for a colorful presentation.
    • Top with a sprinkle of cinnamon for extra flavor.
    • Add a dollop of Greek yogurt for creaminess.
    • Pair with whole grain toast for a satisfying breakfast.
    • Enjoy as a post-workout snack for a healthy boost.
    • Mix in some granola for added crunch and texture.
    • Serve alongside a refreshing herbal tea for a light afternoon treat.
    • Garnish with fresh mint leaves for a pop of color and freshness.

    Make Ahead and Storage

    Storing Leftovers

    Store leftovers in an airtight container.

    Refrigerate within two hours of preparation.

    Consume within 3-4 days for best freshness.

    Freezing

    Place in a freezer-safe container or bag.

    Leave space for expansion when sealing.

    Label with the date and freeze for up to 3 months.

    Reheating

    Thaw in the refrigerator overnight before reheating.

    Use a microwave or stovetop for gentle reheating.

    Add a splash of water to maintain moisture.

    FAQs

    What fruits work best in a Fruit and Nut Bowl ?

    For a delicious Fruit and Nut Bowl, consider using a mix of seasonal fruits like berries, bananas, apples, and oranges. These fruits not only add vibrant colors but also provide a variety of flavors and textures that complement the nuts beautifully.

    Can I use different types of nuts?

    Absolutely! Feel free to mix and match your favorite nuts. Almonds, walnuts, pecans, and cashews all work wonderfully. Just be mindful of any nut allergies and choose accordingly!

    How can I make the honey drizzle healthier?

    If you’re looking to make the honey drizzle a bit healthier, consider using agave syrup or maple syrup as alternatives. They provide a similar sweetness with different flavor profiles, making your bowl even more delightful!

    Can I prepare the Fruit and Nut Bowl in advance?

    Yes, you can prepare the components in advance! Just keep the fruits and nuts separate until you’re ready to serve to maintain freshness. Drizzle the honey just before serving for the best taste.

    Final Thoughts

    So there you have it your very own Fruit and Nut Bowl with Honey Drizzle! It’s a delightful treat that’s as simple as it is rewarding. Picture yourself enjoying this colorful bowl, bursting with flavors and nostalgia. Whether it’s a quick breakfast or a sweet snack, this recipe is sure to brighten your day. Dive in, savor every bite, and share the joy with friends and family!

  • Chocolate Oatmeal Without Eggs

    Chocolate Oatmeal Without Eggs

    Chocolate Oatmeal Without Eggs is a delightful morning treat that combines rich cocoa with hearty oats for a breakfast that feels indulgent yet wholesome. Imagine waking up to a warm bowl of creamy chocolate goodness, sweetened naturally with ripe bananas and a splash of almond milk. This recipe is not just egg-free; it’s a celebration of flavors, topped with fresh berries and a sprinkle of nuts for that perfect crunch. It’s a cozy hug in a bowl, making your mornings brighter and your taste buds happier. Dive in and enjoy this guilt-free delight!

    Why You’ll Love This Recipe

    • Indulge in rich chocolate flavor without the guilt.
    • Enjoy a quick and easy breakfast ready in minutes.
    • Packed with fiber and nutrients to keep you full.
    • Perfect for those with egg allergies or dietary restrictions.
    • Customize with your favorite toppings for a personal touch!
    Different serving suggestions for Chocolate Oatmeal Without Eggs.

    Chocolate Oatmeal Without Eggs

    Indulge in a delicious bowl of Chocolate Oatmeal Without Eggs! Easy to make, healthy, and perfect for breakfast. 🍫🥣
    Prep Time 5 minutes
    Cook Time 10 minutes
    Total Time 15 minutes
    Servings: 2 servings
    Course: Breakfast
    Cuisine: American
    Calories: 250

    Ingredients
      

    Dry Ingredients
    • 1 cup Rolled Oats A hearty base that provides fiber and texture.
    • 2 tablespoons Cocoa Powder Adds rich chocolate flavor without extra sugar.
    Liquid Ingredients
    • 2 cups Almond Milk A dairy-free alternative that keeps it light and creamy.
    • 1 banana Banana A natural sweetener and binder, perfect for creaminess.
    • 2 tablespoons Maple Syrup A touch of sweetness that complements the chocolate.
    • 1 teaspoon Vanilla Extract Enhances the overall flavor profile.
    • 1 pinch Salt Balances the sweetness and enhances flavors.
    • 1 tablespoon Chia Seeds Boosts nutrition and helps thicken the oatmeal.

    Equipment

    • 1 Medium saucepan For cooking the oatmeal.

    Method
     

    Step 1: Gather Your Ingredients
    1. Collect rolled oats, cocoa powder, almond milk, maple syrup, vanilla extract, and a pinch of salt.
    Step 2: Combine Dry Ingredients
    1. In a medium saucepan, mix rolled oats, cocoa powder, and salt together.
    Step 3: Add Liquid Ingredients
    1. Pour in almond milk and add maple syrup and vanilla extract. Stir well to combine.
    Step 4: Cook the Oatmeal
    1. Place the saucepan over medium heat. Stir occasionally as the mixture heats up.
    Step 5: Simmer and Thicken
    1. Once it starts to bubble, reduce heat and let it simmer for about 5-7 minutes until thickened.
    Step 6: Serve and Enjoy
    1. Remove from heat, pour into a bowl, and top with your favorite fruits or nuts. Dig in and enjoy your healthy delight!

    Notes

    Essential nutrition facts per serving:
    Nutrition Value
    Calories 250
    Fat 5g
    Protein 6g
    Carbs 45g
    Fiber 8g
    Sugar 10g

    Recipe Snapshot

    FeatureDetails
    Category:Breakfast
    Cuisine:American
    Prep Time:5 minutes
    Cook Time:10 minutes
    Total Time:15 minutes
    Dietary:Vegan, Gluten-Free
    Serves:2
    Best Served:Warm

    Ingredients

    Ingredients for Chocolate Oatmeal Without Eggs displayed on a wooden table.
    • Rolled Oats – a hearty base that provides fiber and texture.
    • Cocoa Powder – adds rich chocolate flavor without extra sugar.
    • Banana – a natural sweetener and binder, perfect for creaminess.
    • Almond Milk – a dairy-free alternative that keeps it light and creamy.
    • Maple Syrup – a touch of sweetness that complements the chocolate.
    • Chia Seeds – boosts nutrition and helps thicken the oatmeal.
    • Vanilla Extract – enhances the overall flavor profile.
    • Salt – a pinch to balance the sweetness and enhance flavors.

    Ingredients with measurements will be right under the article in the recipe card.

    How to Make the Recipe

    A step-by-step guide to making Chocolate Oatmeal Without Eggs, showcasing ingredients and cooking process.

    Get ready to whip up a delicious bowl of Chocolate Oatmeal Without Eggs! Follow these simple steps for a delightful breakfast treat.

    Step 1: Gather Your Ingredients

    Collect rolled oats, cocoa powder, almond milk, maple syrup, vanilla extract, and a pinch of salt.

    Step 2: Combine Dry Ingredients

    In a medium saucepan, mix rolled oats, cocoa powder, and salt together.

    Step 3: Add Liquid Ingredients

    Pour in almond milk and add maple syrup and vanilla extract. Stir well to combine.

    Step 4: Cook the Oatmeal

    Place the saucepan over medium heat. Stir occasionally as the mixture heats up.

    Step 5: Simmer and Thicken

    Once it starts to bubble, reduce heat and let it simmer for about 5-7 minutes until thickened.

    Step 6: Serve and Enjoy

    Remove from heat, pour into a bowl, and top with your favorite fruits or nuts. Dig in and enjoy your healthy delight!

    Pro Tips for Making the Recipe

    • Use rolled oats for a chewier texture and better flavor absorption.
    • Experiment with different plant-based milk for varied creaminess.
    • Add a pinch of salt to enhance the chocolate flavor.
    • Top with fresh fruits or nuts for added nutrition and crunch.
    • Let it sit for a few minutes after cooking for a thicker consistency.

    How to Serve

    • Top with fresh berries for a burst of flavor.
    • Drizzle with maple syrup or agave for added sweetness.
    • Sprinkle with nuts or seeds for a crunchy texture.
    • Add a dollop of nut butter for creaminess and protein.
    • Mix in a scoop of your favorite protein powder for an extra boost.
    • Serve warm with a splash of almond or coconut milk.
    • Garnish with shredded coconut for a tropical twist.
    • Pair with a side of sliced banana for a delightful combo.
    • Enjoy with a cup of herbal tea or coffee for a cozy breakfast.

    Make Ahead and Storage

    Storing leftovers properly ensures your Chocolate Oatmeal Without Eggs stays fresh and delicious.

    Storing Leftovers

    • Allow the oatmeal to cool completely before storing.
    • Transfer to an airtight container.
    • Store in the refrigerator for up to 4 days.
    • Label the container with the date for easy tracking.

    Freezing

    • Portion the oatmeal into freezer-safe containers.
    • Leave some space at the top for expansion.
    • Seal tightly to prevent freezer burn.
    • Freeze for up to 3 months for best quality.

    Reheating

    • Thaw overnight in the refrigerator before reheating.
    • Reheat in the microwave, stirring every 30 seconds.
    • Add a splash of almond milk for creaminess.
    • Heat until warmed through, but avoid overcooking.

    FAQs

    Here are some common questions about making Chocolate Oatmeal Without Eggs.

    Can I use instant oats for this recipe?

    Yes, you can use instant oats! Just be aware that the texture may be slightly different, and the cooking time will be shorter. Keep an eye on it to avoid overcooking.

    What can I substitute for cocoa powder?

    If you don’t have cocoa powder, you can use carob powder as a great alternative. It will give a different flavor but still delicious!

    How can I make this recipe sweeter?

    You can add sweeteners like maple syrup, agave nectar, or even mashed bananas for natural sweetness. Adjust to your taste preferences!

    Can I add fruits or nuts to my chocolate oatmeal?

    Absolutely! Adding fruits like bananas or berries and nuts like almonds or walnuts can enhance the flavor and nutrition of your oatmeal. Get creative!

    Final Thoughts

    There you have it Chocolate Oatmeal Without Eggs is not just a dish; it’s a warm hug in a bowl! Simple, delicious, and oh-so-rewarding, this recipe is perfect for any time of day. So, grab your ingredients, whip up this delightful treat, and let the rich chocolatey goodness take you back to those cozy mornings. Enjoy every spoonful, and share the joy with friends and family!

  • 5 Quick and Healthy Breakfasts Without Eggs or Bread (Perfect for Allergies & Gluten-Free Diets)

    5 Quick and Healthy Breakfasts Without Eggs or Bread (Perfect for Allergies & Gluten-Free Diets)

    Whether you’re dealing with food allergies, following a gluten free diet, or simply looking to shake up your morning routine, skipping eggs and bread doesn’t mean sacrificing flavor or satisfaction. These five quick and wholesome breakfast ideas are light, fresh, and wonderfully easy to make. From creamy chia pudding to savory avocado bites, each recipe is proof that mornings can be both simple and nourishing.

    1. Chia Pudding with Almond Milk and Berries

    Chia pudding in a glass jar topped with fresh berries and mint on a white table. Healthy
    A light, healthy, and nutritious chia pudding made with almond milk perfect for gluten-free and egg-free mornings.

    Chia seeds are small but mighty rich in fiber, omega 3s, and plant-based protein. When soaked overnight in almond milk, they form a creamy, pudding-like texture that’s both filling and refreshing.

    How to make it: Combine chia seeds with unsweetened almond milk and a splash of vanilla. Let it sit overnight in the fridge. Come morning, give it a stir and top with fresh berries or sliced banana.

    Why you’ll love it: It’s a naturally gluten free, dairy-free, and egg free breakfast that feels indulgent yet nourishing. Perfect for slow mornings or grab and go jars.

    2. Avocado Salad on Cucumber Rounds

    Fresh cucumber rounds topped with mashed avocado and chopped cherry tomatoes.
    Low-carb avocado salad served on crunchy cucumber slices a refreshing, egg-free breakfast idea.

    If toast is off the table, try cucumber slices as a cool, crunchy base. Topped with mashed avocado and cherry tomatoes, these bites are a bright and savory way to start the day.

    How to make it: Mash a ripe avocado with a squeeze of lemon juice, sea salt, and black pepper. Spoon onto thick slices of cucumber and finish with diced tomatoes or red onion.

    Why you’ll love it: It’s light yet satisfying, loaded with healthy fats, and comes together in minutes. Bonus: It makes a beautiful addition to any brunch spread.

    3. Chocolate Oatmeal Without Eggs

    Bowl of chocolate oatmeal topped with banana slices and cinnamon.
    Warm and cozy chocolate oatmeal topped with bananas – a comforting breakfast with no eggs.

    Warm, creamy oatmeal doesn’t need eggs or dairy to feel comforting. Adding a touch of cocoa transforms this breakfast staple into something that tastes almost like dessert.

    How to make it: Simmer rolled oats in almond milk, stir in cocoa powder and a drizzle of maple syrup. Top with banana slices and a dash of cinnamon for cozy, chocolatey goodness.

    Why you’ll love it: It’s hearty, gluten-free, and endlessly adaptable. Think: almond butter, coconut flakes, or even dark chocolate chips.

    4. Fruit & Nut Bowl with Honey Drizzle

    Colorful fruit and nut mix in a bowl with honey drizzled on top.
    A vibrant bowl of diced fruit, crunchy nuts, and honey – perfect for a light, allergy-friendly breakfast.

    Some mornings call for simplicity. A bowl of seasonal fruit paired with crunchy nuts and a drizzle of honey can be just what you need.

    How to make it: Dice your favorite fruit apples, pears, or berries work beautifully and toss with walnuts or almonds. Add a small spoonful of raw honey and a sprinkle of cinnamon if desired.

    Why you’ll love it: No cooking, no fuss just clean, natural flavors. It’s an ideal option for warm days, or when your schedule calls for something quick and light.

    5. Banana Oat Smoothie

    Banana oat smoothie in a tall glass with a paper straw, oats and banana on the side.
    Creamy banana and oat smoothie served chilled a fast and filling breakfast without eggs.

    Creamy, naturally sweet, and completely customizable, this smoothie is your answer to busy mornings. Oats add fiber and bulk, while banana provides energy and a smooth texture.

    How to make it: Blend one ripe banana with rolled oats, almond milk, and a spoonful of peanut butter. Ice cubes and cinnamon optional but highly recommended.

    Why you’ll love it: It’s rich, satisfying, and ready in two minutes flat. Add spinach or flaxseeds for an extra nutritional boost.

    FAQ Section:

    Q: What can I eat for breakfast without eggs or bread?
    A: Smoothies, chia pudding, fruit bowls, and oatmeal are excellent options.

    Q: Is it healthy to skip eggs and bread in the morning?
    A: Absolutely. There are many nutritious, balanced alternatives that provide fiber, protein, and energy.

    Q: Are these recipes good for gluten-free diets?
    A: Yes! All are naturally gluten free if you use certified oats and plant based ingredients

    A New Way to Breakfast

    Whether you’re avoiding eggs and bread for health reasons or just seeking variety, these breakfasts prove you can start the day right without relying on the usual staples. With a little creativity and a few pantry basics, mornings can be both simple and nourishing.

    Conclusion:

    Eating a satisfying breakfast without eggs or bread is not only possible it’s delicious!

    These 5 easy ideas are proof that you don’t need traditional ingredients to fuel your morning. Whether you’re avoiding allergens or just want variety, these recipes have you covered.

    Tried one of these? Leave a comment below and share your favorite egg free, bread-free breakfast!

  • Avocado Salad on Cucumber Rounds: The Ultimate Fresh Delight

    Avocado Salad on Cucumber Rounds: The Ultimate Fresh Delight

    Avocado Salad on Cucumber Rounds is a vibrant, refreshing treat that dances on your palate! Imagine creamy avocado mixed with zesty lime, crisp bell peppers, and a sprinkle of fresh herbs, all perched atop cool, crunchy cucumber rounds. This delightful combination not only looks stunning on your plate but also bursts with flavor in every bite. Perfect for a light appetizer or a healthy snack, these little bites of joy are sure to impress your guests and satisfy your cravings. Dive into this deliciously simple recipe and elevate your snacking game!

    Why You’ll Love This Recipe

    • It’s a refreshing twist on traditional salads.
    • Perfect for summer gatherings or light lunches.
    • Low in calories but packed with nutrients.
    • Easy to prepare in just minutes.
    • Great for impressing guests with minimal effort.
    Creative serving suggestions for Avocado Salad on Cucumber Rounds.
    Aria Belle

    Avocado Salad on Cucumber Rounds

    Discover the refreshing Avocado Salad on Cucumber Rounds! A perfect blend of flavors and textures, ideal for any occasion. 🥑🥒
    Prep Time 15 minutes
    Total Time 15 minutes
    Servings: 4 servings
    Course: Salad
    Cuisine: Mexican
    Calories: 150

    Ingredients
      

    Base Ingredients
    • 2 medium Avocado Ripe and creamy.
    • 1 large Cucumber Washed and sliced into rounds.
    • 1 cup cup Cherry Tomatoes Chopped.
    Flavor Enhancers
    • 1/4 medium Red Onion Finely chopped.
    • 2 tablespoons Lemon Juice Freshly squeezed.
    • to taste Salt For seasoning.
    • to taste Black Pepper For seasoning.
    • optional Fresh Cilantro For garnish.

    Equipment

    • 1 Mixing bowl For mixing the avocado salad.
    • 1 Serving Platter To serve the cucumber rounds.

    Method
     

    Gather Your Ingredients
    1. Collect ripe avocados, fresh cucumbers, cherry tomatoes, red onion, lime juice, salt, and pepper.
    Prepare the Cucumbers
    1. Wash the cucumbers thoroughly. Slice them into ½ inch thick rounds. Place them on a serving platter.
    Make the Avocado Salad
    1. In a mixing bowl, scoop out the avocados and mash them gently with a fork.
    Add Fresh Ingredients
    1. Chop cherry tomatoes and red onion finely. Add them to the mashed avocado.
    Season the Mixture
    1. Drizzle lime juice over the mixture. Sprinkle with salt and pepper to taste. Mix well.
    Assemble the Dish
    1. Take a spoonful of the avocado salad and place it on each cucumber round.
    Garnish and Serve
    1. Optional: Garnish with fresh herbs like cilantro or parsley. Serve immediately and enjoy!

    Recipe Snapshot

    FeatureDetails
    Category:Salad
    Cuisine:Mexican
    Prep Time:15 minutes
    Cook Time:0 minutes
    Total Time:15 minutes
    Dietary:Gluten-free, Vegan
    Serves:4
    Best Served:Chilled

    Ingredients

    Ingredients for Avocado Salad on Cucumber Rounds displayed on a cutting board.
    Fresh ingredients for a delicious Avocado Salad on Cucumber Rounds.

    Chia pudding is one of the easiest breakfasts you can make ahead of time. It’s creamy, satisfying, and packed with nutrients like fiber, omega-3s, and antioxidants.

    How to make it:

    This fresh and crunchy breakfast option is perfect if you’re craving something savory but light.

    • Avocado – a creamy base that adds healthy fats and flavor.
    • Cucumber – refreshing and crunchy, perfect for serving as rounds.
    • Cherry Tomatoes – adds a burst of sweetness and color.
    • Red Onion – provides a zesty kick and enhances flavor.
    • Lemon Juice – brightens the dish and prevents avocado from browning.
    • Fresh Cilantro – adds a fresh, herbal note to the salad.
    • Salt – enhances all the flavors in the salad.
    • Black Pepper – adds a subtle heat and depth.

    Ingredients with measurements will be right under the article in the recipe card.

    How to Make the Recipe

    Step-by-step preparation of Avocado Salad on Cucumber Rounds with fresh ingredients.
    Step-by-step guide to making Avocado Salad on Cucumber Rounds.

    Get ready to whip up a delightful Avocado Salad on Cucumber Rounds with these easy steps!

    Mash ripe avocado with a splash of lemon juice, salt, pepper, and chopped cherry tomatoes. Spoon the mixture onto thick slices of cucumber for a low-carb, hydrating, and refreshing meal.

    Step 1: Gather Your Ingredients

    Collect ripe avocados, fresh cucumbers, cherry tomatoes, red onion, lime juice, salt, and pepper.

    Step 2: Prepare the Cucumbers

    Wash the cucumbers thoroughly. Slice them into ½ inch thick rounds. Place them on a serving platter.

    Step 3: Make the Avocado Salad

    In a mixing bowl, scoop out the avocados and mash them gently with a fork.

    Step 4: Add Fresh Ingredients

    Chop cherry tomatoes and red onion finely. Add them to the mashed avocado.

    Step 5: Season the Mixture

    Drizzle lime juice over the mixture. Sprinkle with salt and pepper to taste. Mix well.

    Step 6: Assemble the Dish

    Take a spoonful of the avocado salad and place it on each cucumber round.

    Step 7: Garnish and Serve

    Optional: Garnish with fresh herbs like cilantro or parsley. Serve immediately and enjoy!

    Pro Tips for Making the Recipe

    • Choose firm, ripe avocados for the best flavor and texture.
    • Use a serrated knife to slice cucumbers for clean, even rounds.
    • Add a squeeze of lemon juice to the avocado salad to prevent browning.
    • Experiment with herbs like cilantro or dill for an extra flavor boost.
    • Chill the cucumber rounds before serving for a refreshing crunch.

    How to Serve

    Delight in these creative serving suggestions for your Avocado Salad on Cucumber Rounds:

    • Top with a sprinkle of feta cheese for a tangy twist.
    • Garnish with fresh herbs like cilantro or dill for added flavor.
    • Serve alongside whole grain crackers for a crunchy contrast.
    • Pair with a zesty lemon vinaigrette for an extra zing.
    • Use as a filling for lettuce wraps for a refreshing bite.
    • Enjoy as a light appetizer at your next gathering.
    • Mix in diced tomatoes or bell peppers for added color and crunch.
    • Drizzle with balsamic glaze for a sweet finish.

    Make Ahead and Storage

    Proper storage ensures your Avocado Salad on Cucumber Rounds stays fresh and delicious.

    Storing Leftovers

    Follow these tips to store your leftovers:

    • Transfer leftovers to an airtight container.
    • Keep in the refrigerator for up to 2 days.
    • Layer cucumber rounds with parchment paper to prevent sogginess.

    Freezing

    Freezing is not recommended for this dish, but if needed:

    • Freeze the avocado salad separately from cucumber rounds.
    • Use a freezer-safe container to avoid freezer burn.
    • Thaw in the refrigerator before serving.

    Reheating

    To maintain the best texture and taste:

    • Reheat the avocado salad gently in the microwave.
    • Avoid reheating cucumber rounds; serve fresh.
    • Mix well after reheating to restore consistency.

    FAQs

    What can I substitute for lime juice in the avocado salad?

    Don’t worry if you don’t have lime juice! You can use lemon juice as a great alternative. It will still provide that zesty flavor that brightens up the salad. Just remember to adjust the quantity to your taste!

    How can I keep the avocado from browning?

    To keep your avocado fresh and green, try adding a bit of extra lime or lemon juice to the mixture. The acidity helps slow down the browning process. You can also cover the salad tightly with plastic wrap to minimize exposure to air.

    Can I make this salad ahead of time?

    Absolutely! You can prepare the avocado salad a few hours in advance. Just keep it refrigerated in an airtight container. However, it’s best to assemble it on cucumber rounds right before serving to maintain their crispness.

    What other toppings can I add to the cucumber rounds?

    Feel free to get creative! You can add toppings like cherry tomatoes, feta cheese, or even a sprinkle of sesame seeds for extra flavor and texture. Just ensure they complement the avocado salad for a delightful bite!

    Final Thoughts

    There you have it Avocado Salad on Cucumber Rounds, a delightful treat that’s as easy to whip up as it is to enjoy! Picture sunny days and laughter with friends as you serve this refreshing dish. It’s a simple pleasure that brings joy to any gathering. So grab those cucumbers and avocados, and let the fun begin! You’ll be savoring every bite in no time!

  • Pistachio Butter: The Ultimate Creamy Delight You’ll Love!

    Pistachio Butter: The Ultimate Creamy Delight You’ll Love!

    Pistachio butter is a luscious, nutty spread that will elevate your breakfast and snack game to new heights! Imagine spreading this vibrant green delight on warm toast, drizzling it over pancakes, or swirling it into your morning smoothie for a creamy twist. With its rich flavor and smooth texture, this homemade pistachio butter is not only easy to make but also packed with nutrients. Just blend roasted pistachios with a hint of honey and a pinch of salt, and you’ll have a dreamy concoction that’s perfect for any occasion. Dive in and enjoy the nutty goodness!

    Why You’ll Love This Recipe

    • Indulge in a creamy texture that melts in your mouth.
    • Enjoy a nutritious boost packed with healthy fats and protein.
    • Experience a unique flavor that’s both sweet and savory.
    • Perfect for spreading, dipping, or adding to your favorite recipes.
    • Easy to make at home with just a few simple ingredients!
    Different serving ideas for pistachio butter.

    pistachio butter

    Discover the creamy goodness of pistachio butter! Easy to make and deliciously nutty, this spread will elevate your snacks! 🥜✨
    Prep Time 10 minutes
    Total Time 10 minutes
    Servings: 4 servings
    Course: Spread
    Cuisine: Middle Eastern
    Calories: 100

    Ingredients
      

    Pistachios
    • 2 cups Shelled pistachios The main ingredient.
    • 1-2 tablespoons Honey or Maple Syrup For sweetness.
    Salt
    • a pinch Salt Enhances flavor.
    • 1 teaspoon Oil (coconut or avocado) Optional for consistency.
    Vanilla Extract
    • 1 teaspoon Vanilla Extract For flavor.

    Equipment

    • 1 Baking Sheet For toasting pistachios.
    • 1 Food processor For blending the pistachios into butter.

    Method
     

    Step 1: Gather Your Ingredients
    1. Collect 2 cups of shelled pistachios, a pinch of salt, and 1-2 tablespoons of honey or maple syrup for sweetness.
    Step 2: Preheat Your Oven
    1. Preheat your oven to 350°F (175°C) to toast those lovely pistachios.
    Step 3: Toast the Pistachios
    1. Spread the pistachios on a baking sheet and toast for about 8-10 minutes, stirring halfway through. Keep an eye on them!
    Step 4: Let Them Cool
    1. Once toasted, let the pistachios cool for a few minutes. Patience is key!
    Step 5: Blend Away
    1. Transfer the cooled pistachios to a food processor. Blend until smooth, scraping down the sides as needed.
    Step 6: Add Sweetness
    1. Once creamy, add your pinch of salt and honey or maple syrup. Blend again until fully combined.
    Step 7: Adjust Consistency
    1. If you prefer a thinner butter, add a teaspoon of neutral oil and blend until you reach your desired consistency.
    Step 8: Store Your Creation
    1. Transfer your pistachio butter to a jar and store it in the fridge. Enjoy within 2-3 weeks!

    Recipe Snapshot

    FeatureDetails
    Category:Spread
    Cuisine:Middle Eastern
    Prep Time:10 minutes
    Cook Time:0 minutes
    Total Time:10 minutes
    Dietary:Vegan, Gluten-Free
    Serves:4
    Best Served:On toast, in smoothies

    Ingredients

    Ingredients for making pistachio butter displayed on a wooden table.
    All the ingredients you need to make pistachio butter.
    • Pistachios – the star of the show, providing a rich, nutty flavor.
    • Salt – enhances the natural sweetness of the pistachios.
    • Honey or Maple Syrup – adds a touch of sweetness; choose based on your preference.
    • Oil (such as coconut or avocado) – helps achieve a smooth, creamy texture.
    • Vanilla Extract – adds a warm, aromatic flavor that complements the pistachios.

    Ingredients with measurements will be right under the article in the recipe card.

    How to Make the Recipe

    Step-by-step process of making pistachio butter with ingredients and a food processor.
    Step-by-step guide to making delicious pistachio butter.

    Get ready to whip up some delicious pistachio butter with these easy steps!

    Step 1: Gather Your Ingredients

    Collect 2 cups of shelled pistachios, a pinch of salt, and 1-2 tablespoons of honey or maple syrup for sweetness.

    Step 2: Preheat Your Oven

    Preheat your oven to 350°F (175°C) to toast those lovely pistachios.

    Step 3: Toast the Pistachios

    Spread the pistachios on a baking sheet and toast for about 8-10 minutes, stirring halfway through. Keep an eye on them!

    Step 4: Let Them Cool

    Once toasted, let the pistachios cool for a few minutes. Patience is key!

    Step 5: Blend Away

    Transfer the cooled pistachios to a food processor. Blend until smooth, scraping down the sides as needed.

    Step 6: Add Sweetness

    Once creamy, add your pinch of salt and honey or maple syrup. Blend again until fully combined.

    Step 7: Adjust Consistency

    If you prefer a thinner butter, add a teaspoon of neutral oil and blend until you reach your desired consistency.

    Step 8: Store Your Creation

    Transfer your pistachio butter to a jar and store it in the fridge. Enjoy within 2-3 weeks!

    Pro Tips for Making the Recipe

    • Use roasted pistachios for a deeper flavor.
    • Add a pinch of salt to enhance the sweetness.
    • Blend in a bit of coconut oil for extra creaminess.
    • Experiment with honey or maple syrup for natural sweetness.
    • Store in an airtight container to keep it fresh longer.

    How to Serve

    Here are some delightful ways to enjoy your pistachio butter:

    • Spread it on warm toast for a nutty breakfast treat.
    • Use it as a dip for fresh apple or pear slices.
    • Swirl it into your morning oatmeal or yogurt for added creaminess.
    • Drizzle it over pancakes or waffles for a unique twist.
    • Mix it into smoothies for a protein-packed boost.
    • Pair it with dark chocolate for a decadent dessert.
    • Use it as a filling for crepes or pastries.
    • Combine it with honey for a sweet and savory sandwich spread.

    Make Ahead and Storage

    Storing Leftovers

    •Allow pistachio butter to cool completely before storing.
    •Transfer to an airtight container.
    •Store in the refrigerator for up to two weeks.
    •Label the container with the date for easy tracking.

    Freezing

    •Use a freezer-safe container or silicone ice cube tray.
    •Portion out the pistachio butter for easy use.
    •Seal tightly to prevent freezer burn.
    •Label with the date and freeze for up to three months.

    Reheating

    •Thaw in the refrigerator overnight before using.
    •For quick thawing, place the container in warm water.
    •Stir well after reheating to restore creaminess.
    •Avoid using the microwave as it can alter texture.

    you van visit our breakfast, lunch, dinner and desserts recipes from here:
    Breakfast, Lunch, Dinner, Dessert / Cake

    FAQs

    What is pistachio butter made of?

    Pistachio butter is primarily made from roasted pistachios, which are blended until smooth. You can add a pinch of salt or a drizzle of honey for extra flavor, but the main ingredient is simply the nuts themselves!

    How can I use pistachio butter in recipes?

    Pistachio butter is incredibly versatile! You can spread it on toast, mix it into smoothies, or use it as a dip for fruits. It also works wonderfully in baking, adding a unique flavor to cookies and cakes.

    Can I make pistachio butter at home?

    Absolutely! Making pistachio butter at home is easy. Just roast the pistachios, let them cool, and blend them in a food processor until creamy. It’s a fun and rewarding process!

    How should I store pistachio butter?

    Store your pistachio butter in an airtight container in the refrigerator. It can last for several weeks, but it’s so delicious you might finish it much sooner!

    Final Thoughts

    So there you have it—your new favorite treat, pistachio butter! It’s creamy, dreamy, and oh-so-simple to whip up. Spread it on toast, swirl it into smoothies, or just enjoy it by the spoonful! Remember, the joy of making this delightful spread is just as rewarding as savoring it. Dive in, share it with friends, and let the nutty goodness take you back to those cozy moments. Enjoy!

  • Keto Breakfast Cereal: The Ultimate Healthy Start to Your Day!

    Keto Breakfast Cereal: The Ultimate Healthy Start to Your Day!

    Keto breakfast cereal is a delightful way to kickstart your morning with a burst of flavor and nutrition! Imagine a crunchy blend of nuts, seeds, and coconut flakes, all lightly sweetened with a hint of stevia and a sprinkle of cinnamon. This wholesome mix not only satisfies your cravings but also keeps you energized and full throughout the day. Just add a splash of almond milk or your favorite dairy-free alternative, and you have a deliciously satisfying bowl that makes breakfast feel like a treat. Dive into this guilt-free indulgence and embrace the day ahead!

    Why You’ll Love This Recipe

    • Enjoy a guilt-free breakfast that keeps you in ketosis.
    • Packed with healthy fats and fiber to fuel your day.
    • Quick and easy to prepare, perfect for busy mornings.
    • Customizable with your favorite nuts and seeds.
    • Deliciously satisfying, you’ll forget it’s healthy!
    Different serving ideas for keto breakfast cereal with various toppings.
    Aria Belle

    keto breakfast cereal

    Start your day right with our delicious keto breakfast cereal! Low-carb, nutritious, and easy to make. Perfect for a healthy lifestyle! 🥣✨
    Prep Time 10 minutes
    Cook Time 5 minutes
    Total Time 15 minutes
    Servings: 2 servings
    Course: Breakfast
    Cuisine: Keto
    Calories: 250

    Ingredients
      

    Dry Ingredients
    • 1 cup Almond Flour A low-carb base that adds a nutty flavor and texture.
    • 2 tablespoons Chia Seeds Packed with fiber and omega-3s, they help keep you full.
    • 2 tablespoons Unsweetened Cocoa Powder Adds rich chocolate flavor without sugar.
    Coconut Flakes
    • 1/4 cup Unsweetened Coconut Flakes Provides healthy fats and a touch of sweetness.
    • 2 tablespoons Stevia or Erythritol Natural sweeteners that keep it keto-friendly.
    Liquid Ingredients
    • 1 cup Unsweetened Almond Milk A creamy, low-carb milk alternative for serving.
    • 1/4 cup Chopped Nuts Walnuts or pecans work wonderfully for crunch.

    Equipment

    • 1 Large Bowl For mixing ingredients.
    • 1 Spoon For stirring.

    Method
     

    Step 1: Gather Your Ingredients
    1. Collect all your ingredients: almond flour, chia seeds, unsweetened cocoa powder, unsweetened coconut flakes, nuts, and your favorite low-carb sweetener.
    Step 2: Mix the Dry Ingredients
    1. In a large bowl, combine 1 cup of almond flour, 2 tablespoons of chia seeds, 2 tablespoons of cocoa powder, and 1/4 cup of unsweetened coconut flakes.
    Step 3: Add Sweetener
    1. Stir in your preferred low-carb sweetener, adjusting to taste. Start with 2 tablespoons and add more if you like it sweeter!
    Step 4: Incorporate Nuts
    1. Add 1/4 cup of chopped nuts for that delightful crunch. Walnuts or pecans work wonderfully!
    Step 5: Mix in Liquid
    1. Pour in 1 cup of unsweetened almond milk or coconut milk. Stir until everything is well combined.
    Step 6: Let It Sit
    1. Allow the mixture to sit for about 5-10 minutes. This helps the chia seeds absorb the liquid and thicken the cereal.
    Step 7: Serve and Enjoy!
    1. Scoop your cereal into a bowl, add a splash more almond milk if desired, and enjoy your tasty keto breakfast!

    Recipe Snapshot

    FeatureDetails
    Category:Breakfast
    Cuisine:Keto
    Prep Time:10 minutes
    Cook Time:5 minutes
    Total Time:15 minutes
    Dietary:Low-carb, Gluten-free
    Serves:2
    Best Served:With almond milk or coconut milk

    Ingredients

    Ingredients for keto breakfast cereal displayed on a wooden table.
    All the ingredients you need for a delicious keto breakfast cereal.
    • Almond Flour – a low-carb base that adds a nutty flavor and texture.
    • Coconut Flakes – provides healthy fats and a touch of sweetness.
    • Chia Seeds – packed with fiber and omega-3s, they help keep you full.
    • Flaxseed Meal – a great source of fiber and helps bind the cereal together.
    • Unsweetened Cocoa Powder – adds rich chocolate flavor without sugar.
    • Stevia or Erythritol – natural sweeteners that keep it keto-friendly.
    • Salt – enhances the flavors of the other ingredients.
    • Unsweetened Almond Milk – a creamy, low-carb milk alternative for serving.

    Ingredients with measurements will be right under the article in the recipe card.

    How to Make the Recipe

    A step-by-step process of making keto breakfast cereal with ingredients displayed.
    Step-by-step guide to making delicious keto breakfast cereal.

    Get ready to whip up a delicious keto breakfast cereal that will kickstart your day!

    Step 1: Gather Your Ingredients

    Collect all your ingredients: almond flour, chia seeds, unsweetened cocoa powder, unsweetened coconut flakes, nuts, and your favorite low-carb sweetener.

    Step 2: Mix the Dry Ingredients

    In a large bowl, combine 1 cup of almond flour, 2 tablespoons of chia seeds, 2 tablespoons of cocoa powder, and 1/4 cup of unsweetened coconut flakes.

    Step 3: Add Sweetener

    Stir in your preferred low-carb sweetener, adjusting to taste. Start with 2 tablespoons and add more if you like it sweeter!

    Step 4: Incorporate Nuts

    Add 1/4 cup of chopped nuts for that delightful crunch. Walnuts or pecans work wonderfully!

    Step 5: Mix in Liquid

    Pour in 1 cup of unsweetened almond milk or coconut milk. Stir until everything is well combined.

    Step 6: Let It Sit

    Allow the mixture to sit for about 5-10 minutes. This helps the chia seeds absorb the liquid and thicken the cereal.

    Step 7: Serve and Enjoy!

    Scoop your cereal into a bowl, add a splash more almond milk if desired, and enjoy your tasty keto breakfast!

    Pro Tips for Making the Recipe

    •Experiment with different nuts and seeds for added texture and flavor.
    •Use unsweetened almond milk or coconut milk for a creamy base.
    •Add a sprinkle of cinnamon or vanilla extract for a warm, inviting taste.
    •Consider incorporating chia seeds for extra fiber and omega-3s.
    •Make a big batch and store it in an airtight container for quick breakfasts all week!

    How to Serve

    Enjoy your keto breakfast cereal with these fun and delicious ideas:

    • Top with a dollop of Greek yogurt for a creamy texture.
    • Add a sprinkle of cinnamon for a warm, comforting flavor.
    • Mix in a handful of berries for a burst of freshness.
    • Drizzle with sugar-free maple syrup for a touch of sweetness.
    • Pair with unsweetened almond milk for a low-carb option.
    • Incorporate chopped nuts for an extra crunch.
    • Serve alongside a side of scrambled eggs for a protein-packed meal.
    • Blend into a smoothie for a quick, on-the-go breakfast.

    Make Ahead and Storage

    Storing Leftovers

    • Allow the cereal to cool completely before storing.
    • Transfer to an airtight container.
    • Store in the refrigerator for up to 3 days.
    • Label the container with the date for easy tracking.

    Freezing

    • Portion the cereal into freezer-safe containers.
    • Leave some space at the top for expansion.
    • Seal tightly to prevent freezer burn.
    • Freeze for up to 2 months for best quality.

    Reheating

    • Thaw overnight in the refrigerator if frozen.
    • Reheat in a saucepan over low heat, stirring occasionally.
    • Add a splash of almond milk for creaminess.
    • Microwave in short intervals, stirring in between, until warm.

    you van visit our breakfast, lunch, dinner and desserts recipes from here:
    Breakfast, Lunch, Dinner, Dessert / Cake

    FAQs

    What ingredients are typically used in keto breakfast cereal?

    Keto breakfast cereal often includes nuts, seeds, and low-carb sweeteners. Common ingredients are chia seeds, flaxseeds, almonds, and coconut flakes. These provide healthy fats and fiber while keeping carbs low, making them perfect for a keto diet.

    Can I make keto breakfast cereal ahead of time?

    Absolutely! You can prepare your keto breakfast cereal in advance and store it in an airtight container. Just add your favorite milk or yogurt in the morning for a quick and nutritious breakfast.

    How can I customize my keto breakfast cereal?

    You can customize your keto breakfast cereal by adding different nuts, seeds, or spices. Consider incorporating cinnamon for flavor or adding berries for a touch of sweetness while keeping it keto-friendly.

    Is keto breakfast cereal suitable for meal prep?

    Yes, keto breakfast cereal is excellent for meal prep! You can portion it out for the week, making your mornings easier and ensuring you stick to your keto goals without the hassle of cooking each day.

    Final Thoughts

    So there you have it—your new favorite keto breakfast cereal! It’s quick, delicious, and oh-so-satisfying. Picture yourself enjoying a warm bowl, reminiscing about carefree mornings while fueling your body with wholesome goodness. Give it a try, and let the delightful crunch and flavors brighten your day. Remember, breakfast doesn’t have to be boring—embrace this simple, rewarding dish and start your mornings with a smile!